


👋 Introduction
Welcome back to the “time to…” blog series. In the previous post, we discussed how it takes time to perceive the value of introducing a technology into a new or existing stack and that while this value may only be perceived by the end-user once it is rolled out productively, the technical & support team could perceive that value much earlier in the development cycle.
This sparked the idea to create a blog series exploring some new technologies as we take an idea and turn it into a minimum viable product (focussed on an internal tooling use case). The idea itself is not yet ready to be revealed, but we know enough to be able to set up our baseline code repository which will be the focal point of this post.
Without further ado, let's just jump straight into the reality that it takes time to… get started on a new development project. Just like it took some time (more than I would like to admit) to get started with this next blog post.
With a fresh new development project, there is freedom upfront to select tooling and set up the foundations of the codebase. This freedom, however, comes with great responsibility as these foundations can have a significant impact on the time it takes for developers to become productive in a new codebase, and as a project progresses into an inevitably more complex codebase, this impact becomes more and more prevalent.
Initially, the codebase may start out simple, with minimal dependencies and technologies, enabling a developer to get started in a few minutes by skimming the codebase and updating their local development environment with requisite software & packages. If they are working on another codebase that requires a conflicting version of a piece of software, they will need to carefully manage versions of that software as they switch between projects.


As the project matures, and the requisite software diversifies, it takes more time to set up the local development environment and there is a higher risk of discrepancies between the required and actual development environment. Any misalignment can lead to the dreaded “but it worked just fine on my machine” which judging by the number of memes that pop-up up in a google search on this topic is still to this day an issue faced by many.
Along with the software required to build, test, and run the codebase, the setup of the code editor or IDE being used could lead to a vastly different experience between developers, with some having a much smoother experience than others.
At Kenai, we want any member of the tech team (new or old) to be able to become productive in any of our codebases as quickly and with as little friction as possible. Minimizing setup time and frustration allows for the cognitive capacity to be spent on value-adding activities, which is important both for the growth of our product, and to build a sense of confidence and accomplishment as the sooner a developer is able to become productive, the sooner they will see their efforts result in awesome new features and performance enhancements.
This brings us to the part in the post where we will be introducing a technology that can be leveraged to optimize the time to … get started in a development project (be it old or new), give you some of our thoughts and experience with it and provide a bit of a tutorial so that you can get up and running with it in your own time should you want to experience it yourself.
This section will go over some basics that more veteran developers will most likely know like the back of their hand. We are however aware that there may be some readers brand new to development and the tech world (now more so than ever with the shift towards remote work and tech based jobs during the pandemic), so we thought this would be useful to include this to make it accessible for everyone.
The Technology: Code Editor
The core technology we will be showcasing today is a code editor, and as alluded to with the reveal in the last post, we will be using Visual Studio Code (VS Code from hereon in) throughout this series as the code editor.
We have found it to be extremely versatile in being able to be configured for multiple languages through its rich extension ecosystem which enables each developer to extend their VS Code to cater to their needs technically as well as aesthetically.
To minimize the time it takes for a developer to get started in a new codebase, we want to provide clearly defined requirements for the local development environment. Ideally, in such a way that the environment setup can be abstracted from the developer, but also completely transparent should they want to dive deeper.
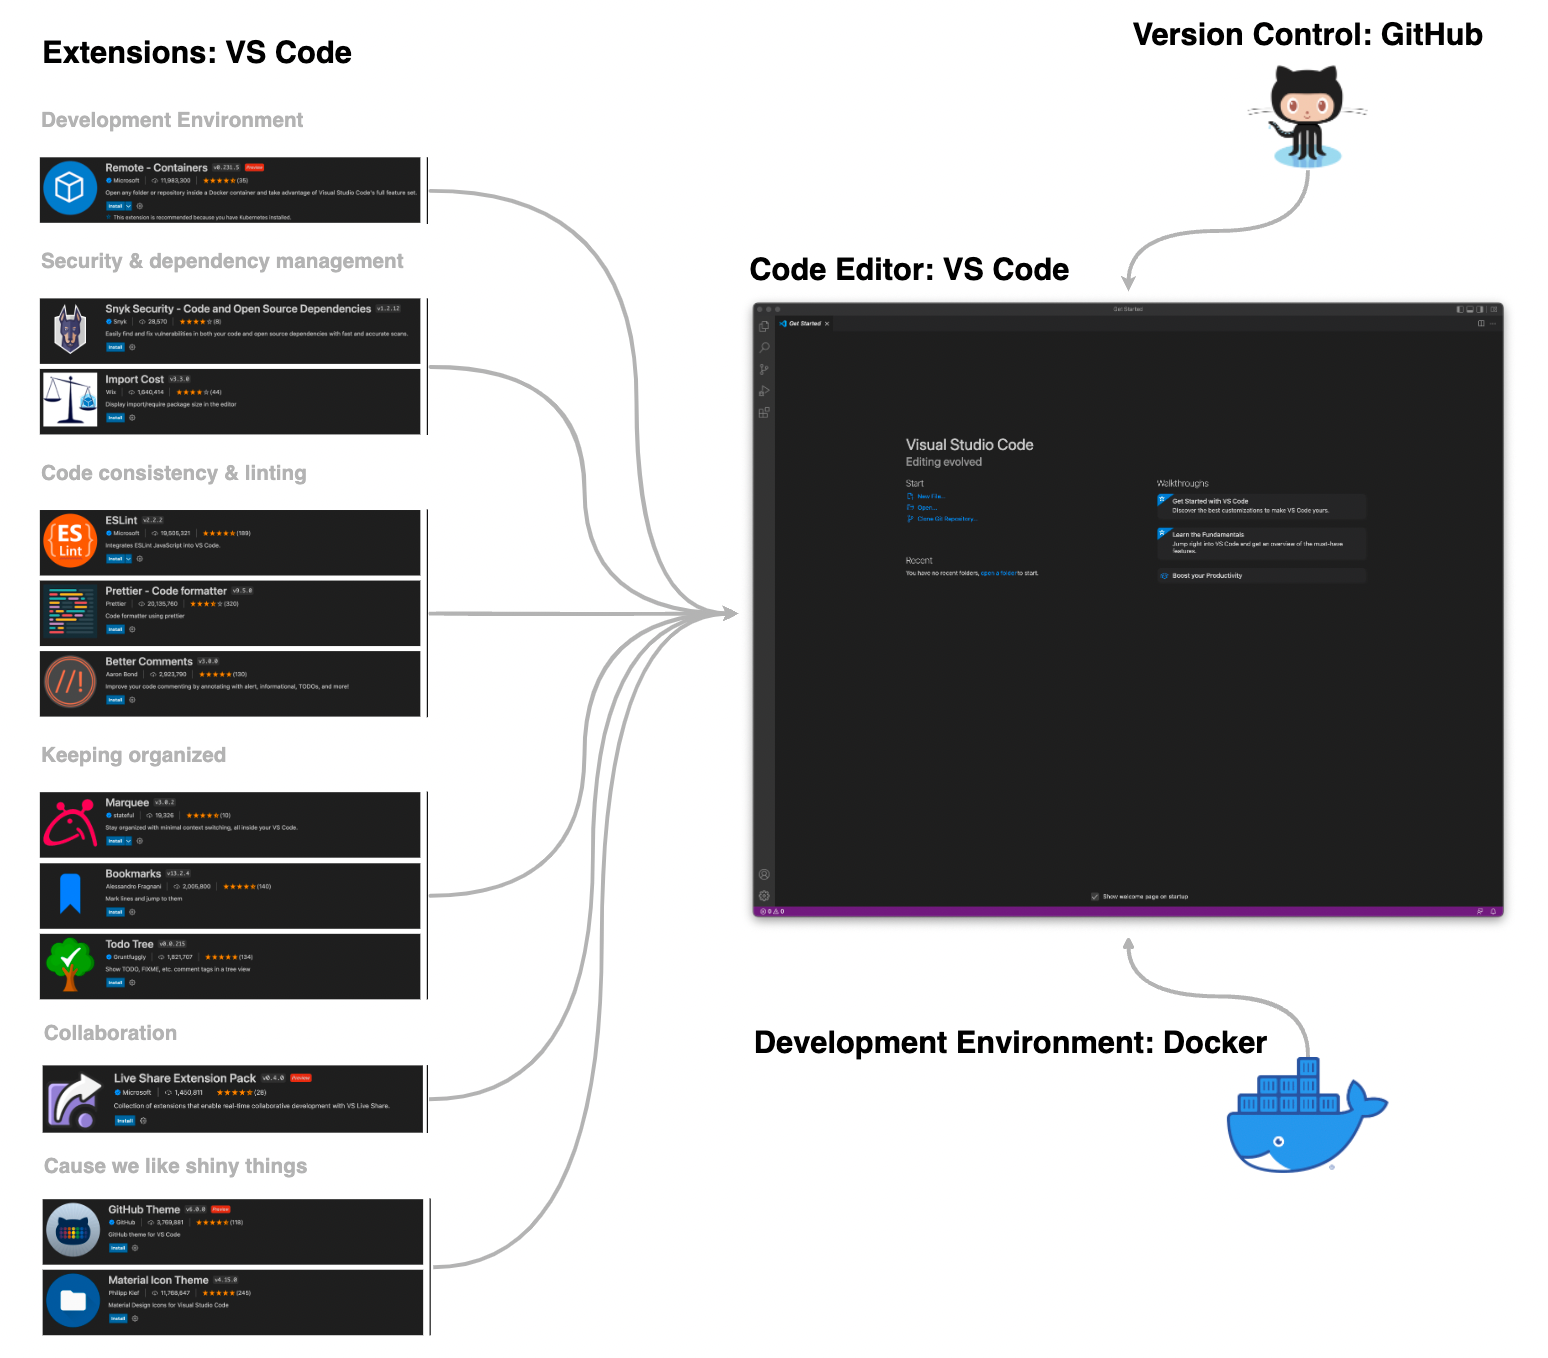
Thanks to some VS Code extensions and Docker, enabling this capability for any developer using VS code is relatively simple. In the sections that follow, we will go through the steps to create the setup as shown in the diagram below which includes:
- Creating a repository from a GitHub template.
- Customizing a vanilla VS Code instance with extensions.
- Defining a development container to provide any developer with the ability to spin up an isolated development environment with all requisite tooling installed so they can hit the ground running, confident that all requisite software is installed and locked to the correct versions.

Just a forewarning, the next bit of content ended up becoming a lot more involved and detailed than initially anticipated. Some of the content may be pedestrian for more advanced developers, so we have broken the content up into bite-sized sections, of which hopefully some prove useful to you. So feel free to jump around and skip anything you’ve seen before.
Git Repository setup with GitHub Templates
Before we get to customizing VS Code, we need some code. Since this is a fresh project, we are going to need to set up the code repository (repo), and for that, we will be using GitHub and a GitHub repository template.
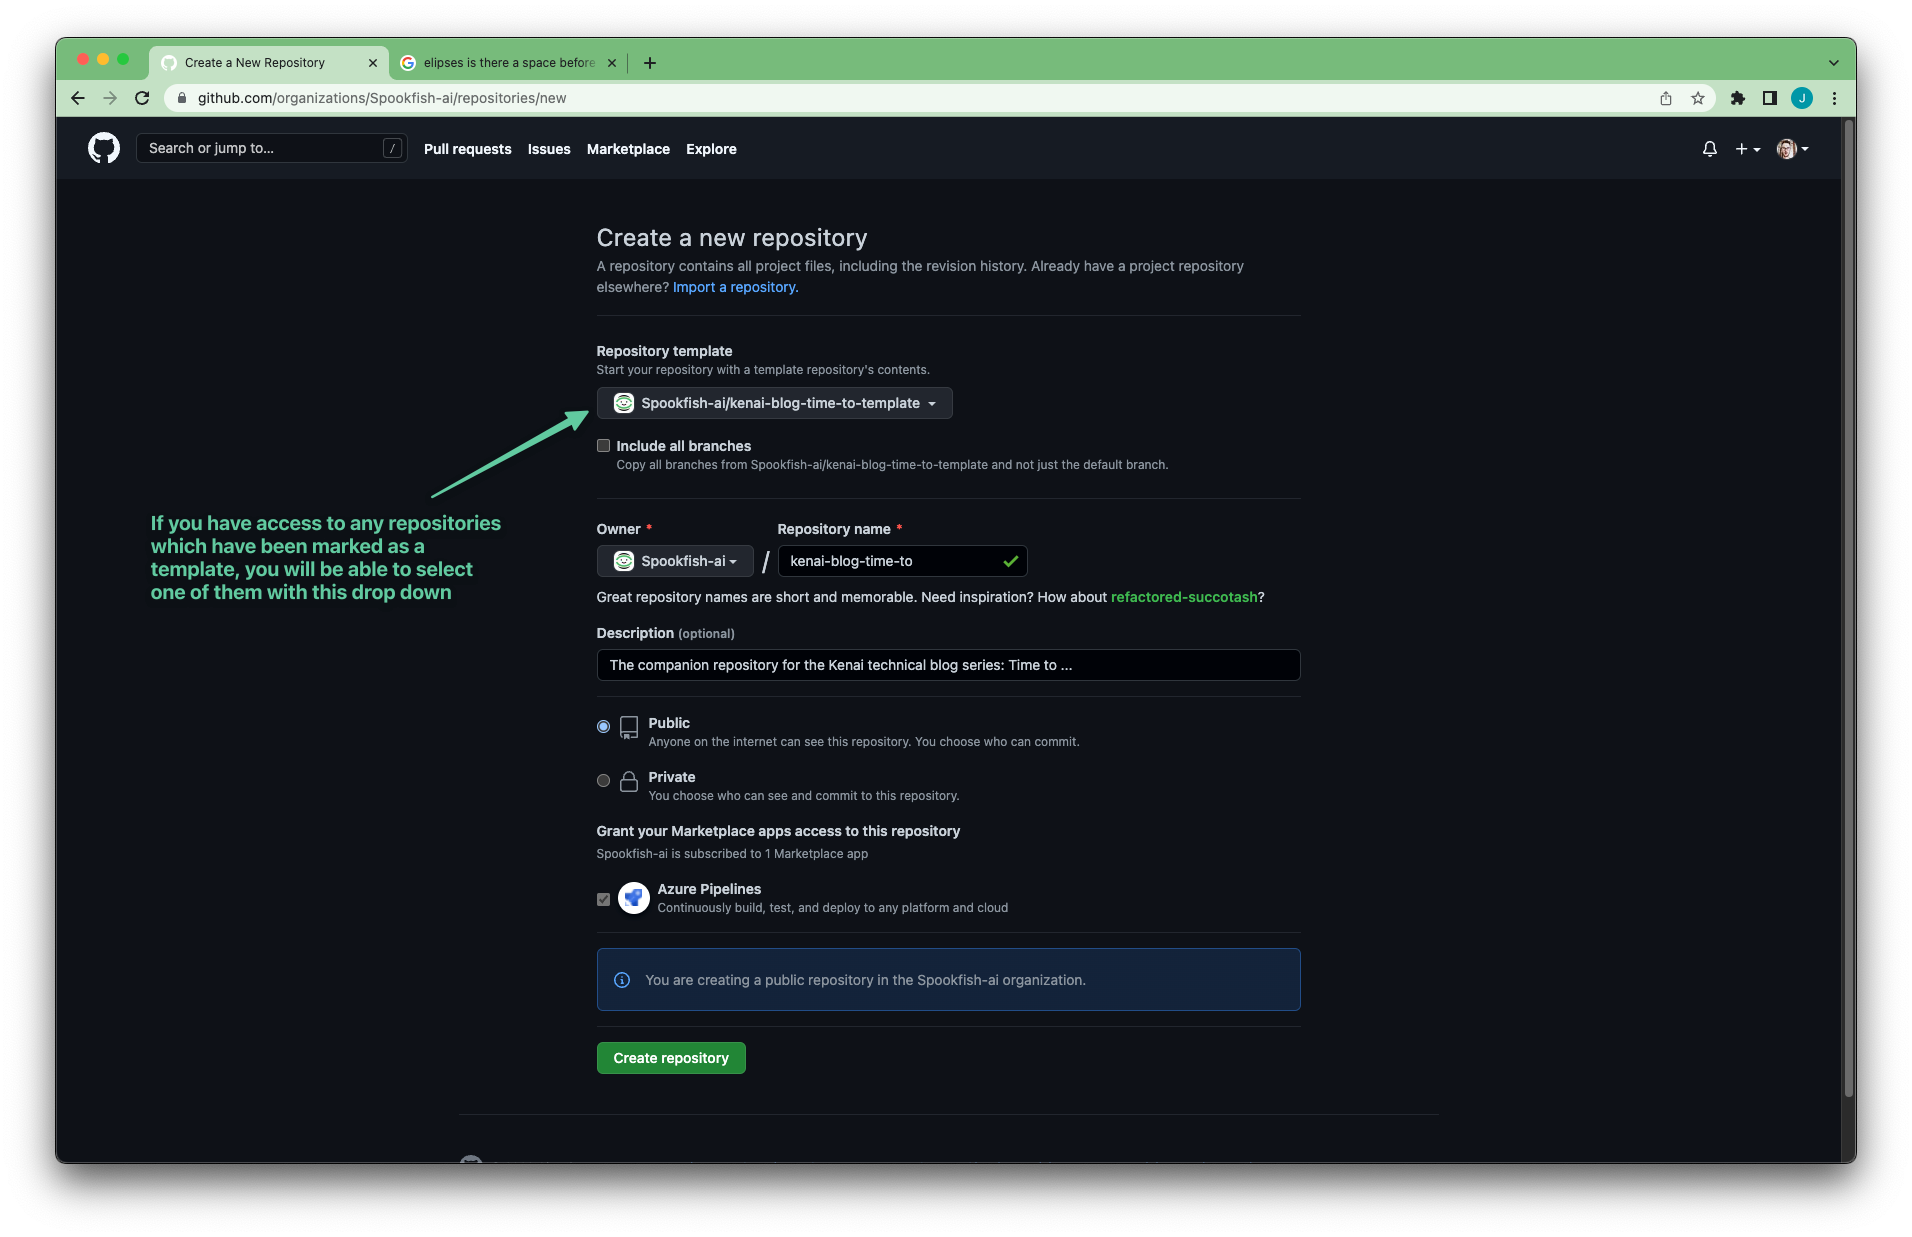
GitHub repository templates can be a big time saver if you find you are frequently creating new repositories that leverage the same initial setup and folder structure and a great way to ensure consistency across related repositories. You can set any repository you own as a template, and then when you create a new repository, you will have an option to select one of your templates as the starting point for the new repository.

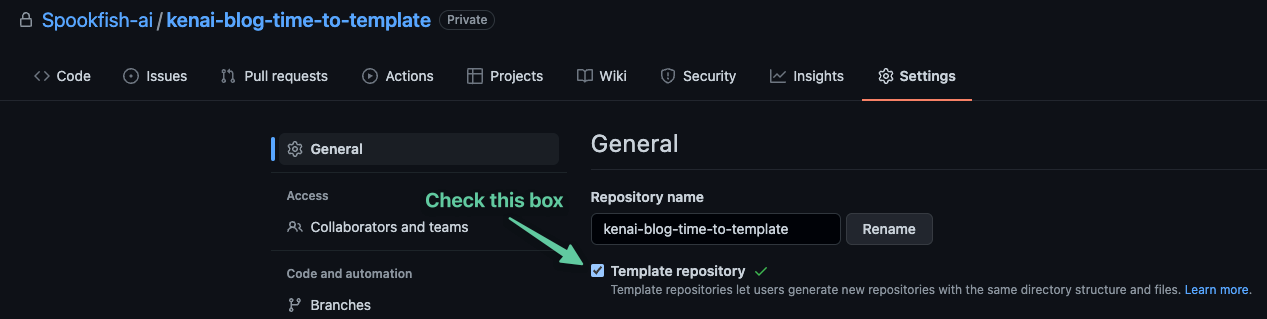
To demonstrate this, we have set up a template for the blog series which we will be leveraging as a starting point for our project. With this available, we can create a new repository and select the option to create from a template.

Customizing VS Code with extensions
Our setup is going to be tailored towards TypeScript and Node.js for this particular project, however, some of the extensions apply across the board and could improve the development experience regardless of the language.
VS Code allows us to define recommended extensions as part of the codebase via a configuration file. The configuration file we will need to modify is extensions.json which can be found at the root of the repository within the .vscode folder:
|-- .vscode
    |-- extensions.json
To add extension recommendations we will need to get the extension identifier in the format ${publisher}.${name} which can be quickly found by navigating to the store page for the extension and copying the itemName query parameter from the URL as shown in the image below.


Then just paste this into the “recommendations" array in the extensions.json file as shown below. Please refer to the official documentation for further details.
//extensions.json
{
"recommendations": [
"ms-vscode-remote.remote-containers",
"snyk-security.snyk-vulnerability-scanner",
"wix.vscode-import-cost",
"dbaeumer.vscode-eslint",
"esbenp.prettier-vscode",
"aaron-bond.better-comments",
"stateful.marquee",
"alefragnani.Bookmarks",
"Gruntfuggly.todo-tree",
"MS-vsliveshare.vsliveshare",
"GitHub.github-vscode-theme",
"PKief.material-icon-theme"
]
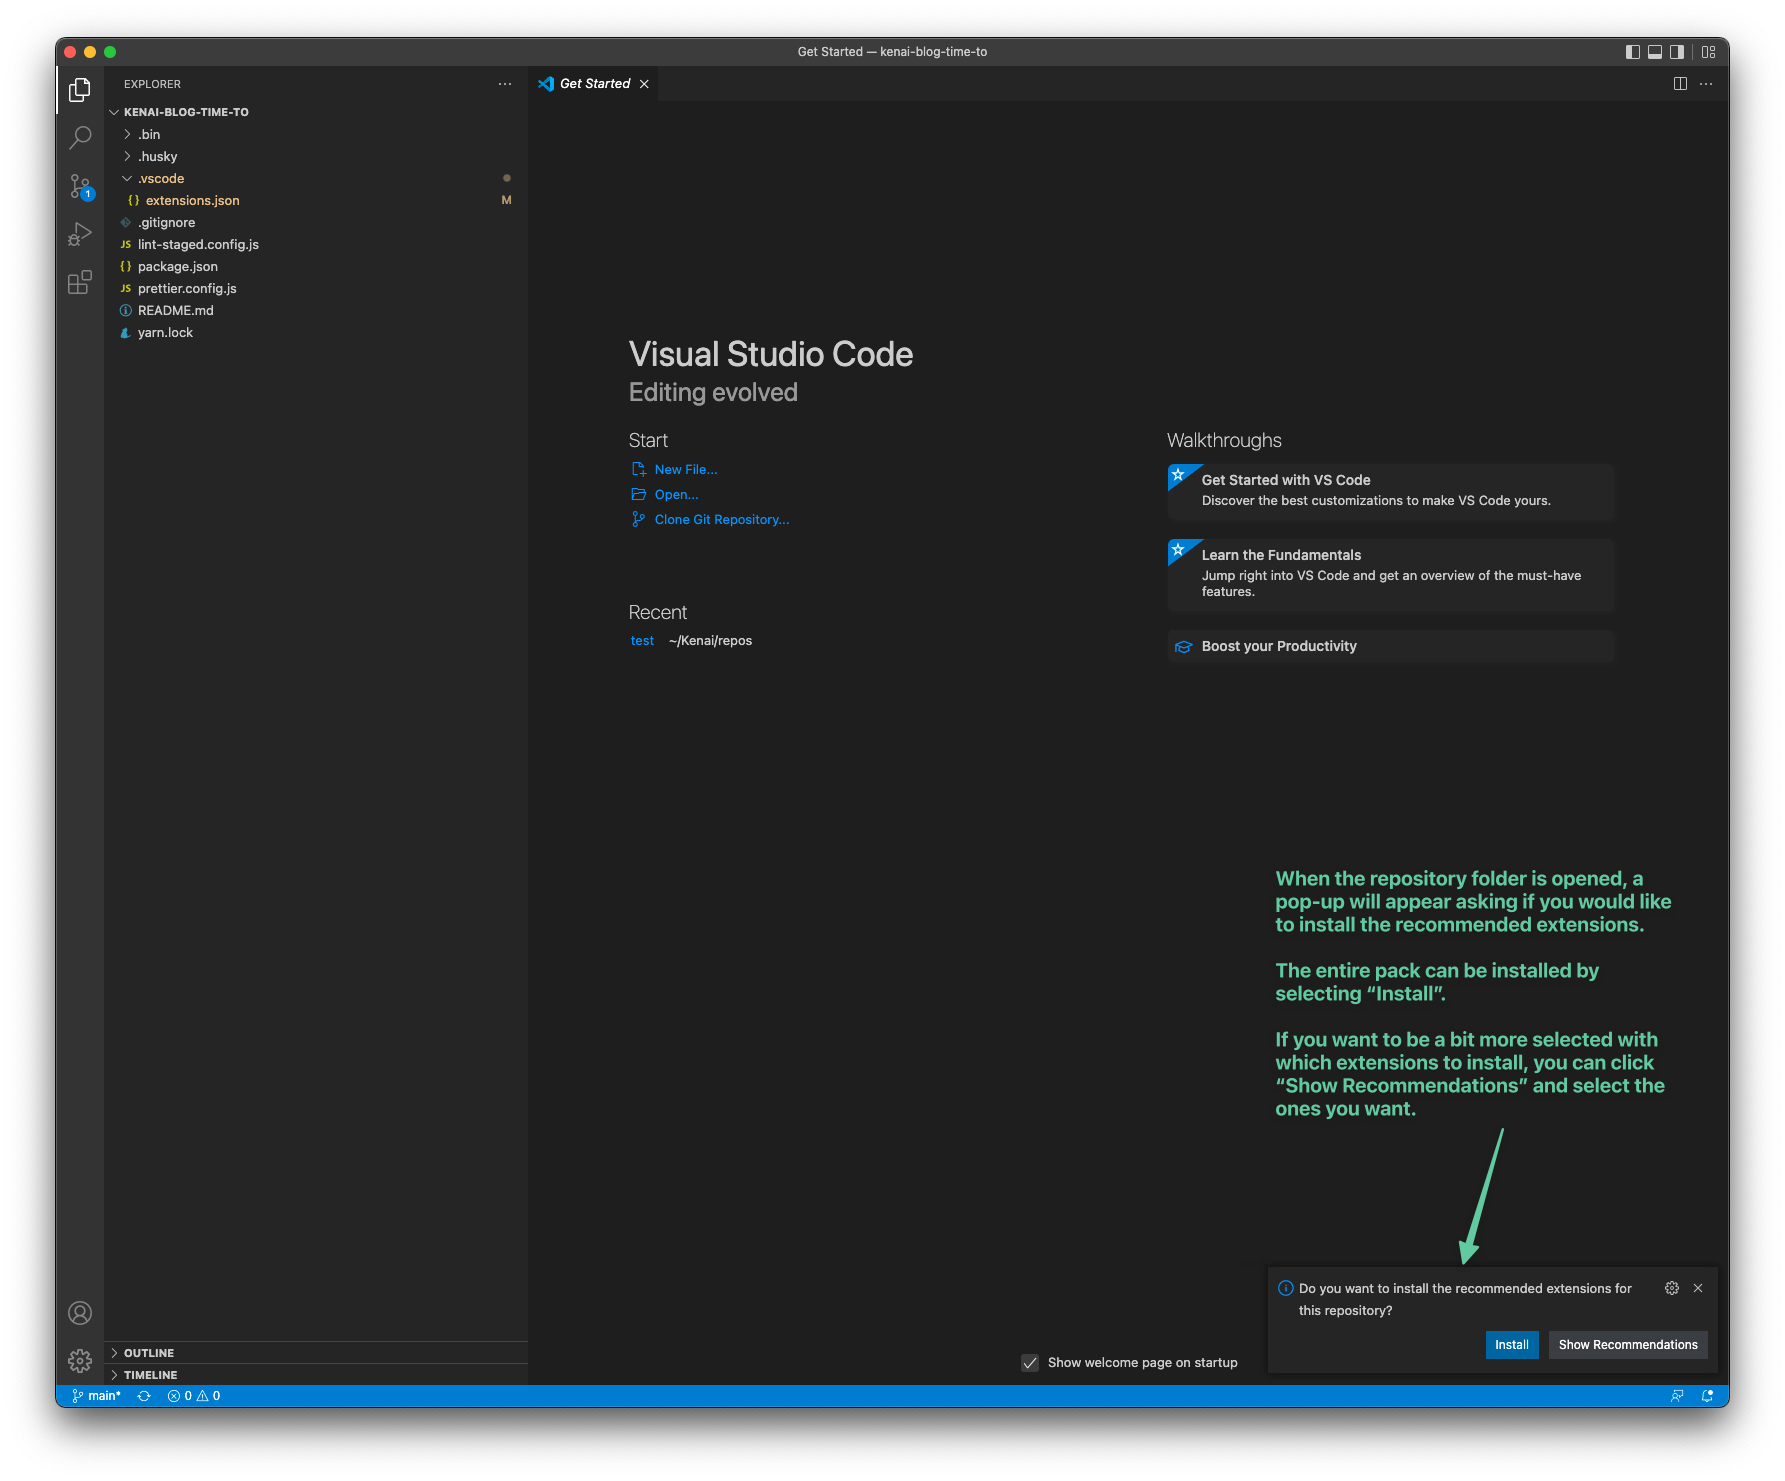
}Now, when the repository is cloned and opened in VS Code, a pop-up will appear indicating that the repository has some recommended extensions (providing notifications that were not previously disabled).

Once they are all installed, we will set the theme and icon pack in the preferences and the VS code will have transformed from the vanilla installation we started with, to being configured (and optionally skinned) just as we need it to get started in this new code repository. If we decide that we do not like any of the extensions, we can easily navigate back to extensions and remove any that have been installed.
Please note that Snyk still needs to be configured with an API key. Please see the “Configuring Snyk“ section for more details.
Our list of VS Code extension recommendations
“Ok great, but what do the extensions actually do?”.

We are glad you asked, here is a bit of a write-up on the extensions we have added to our recommendations as well as a direct link to the extension in the visual studio code marketplace.
🧪Development Environment
We will go into this one in more detail in the next section. In short it enables developers to rapidly spin up isolated development environments set up specifically for the codebase being worked on (leveraging docker behind the scenes).
👮♂️ Security and Dependency Management
- Snyk Security
- Snyk performs code security and quality scans on your codebase as well as leverages its database of open source vulnerabilities to alert for any potential vulnerabilities in your dependencies.
- It requires a Snyk account which has a generous free tier.
- We would also like to give an honourable mention to one of their sister products, Snyk Advisor which is an awesome free resource to evaluate the popularity, sustainability, and security of packages published to npm, PyPI, go, and Docker (at the time of writing).
- Import Cost
- To help keep a tab on bundle size, this neat utility provides an inline view of the bundle size for any imported dependencies which can be used for bundle size optimization should the need arise.
🤓 Code Style and Formatting
- ESLint
- Integrates ESLint into VS Code. This is very useful for picking up code issues at design time and enforcing baseline rules for consistency across the codebase.
- Prettier
- Prettier is a configurable opinionated code formatter that can help ensure consistent code formatting between all developers and across projects.
- Better Comments
- This one could fit more in the aesthetics category, but since it may influence how a developer may write their comments, we have kept it here. It allows one to apply custom formatting to patterns of text that makes it pop out and easier to read. Things like TODO’s can be highlighted in bright red making sure they get noticed.
🗄Organization & Productivity
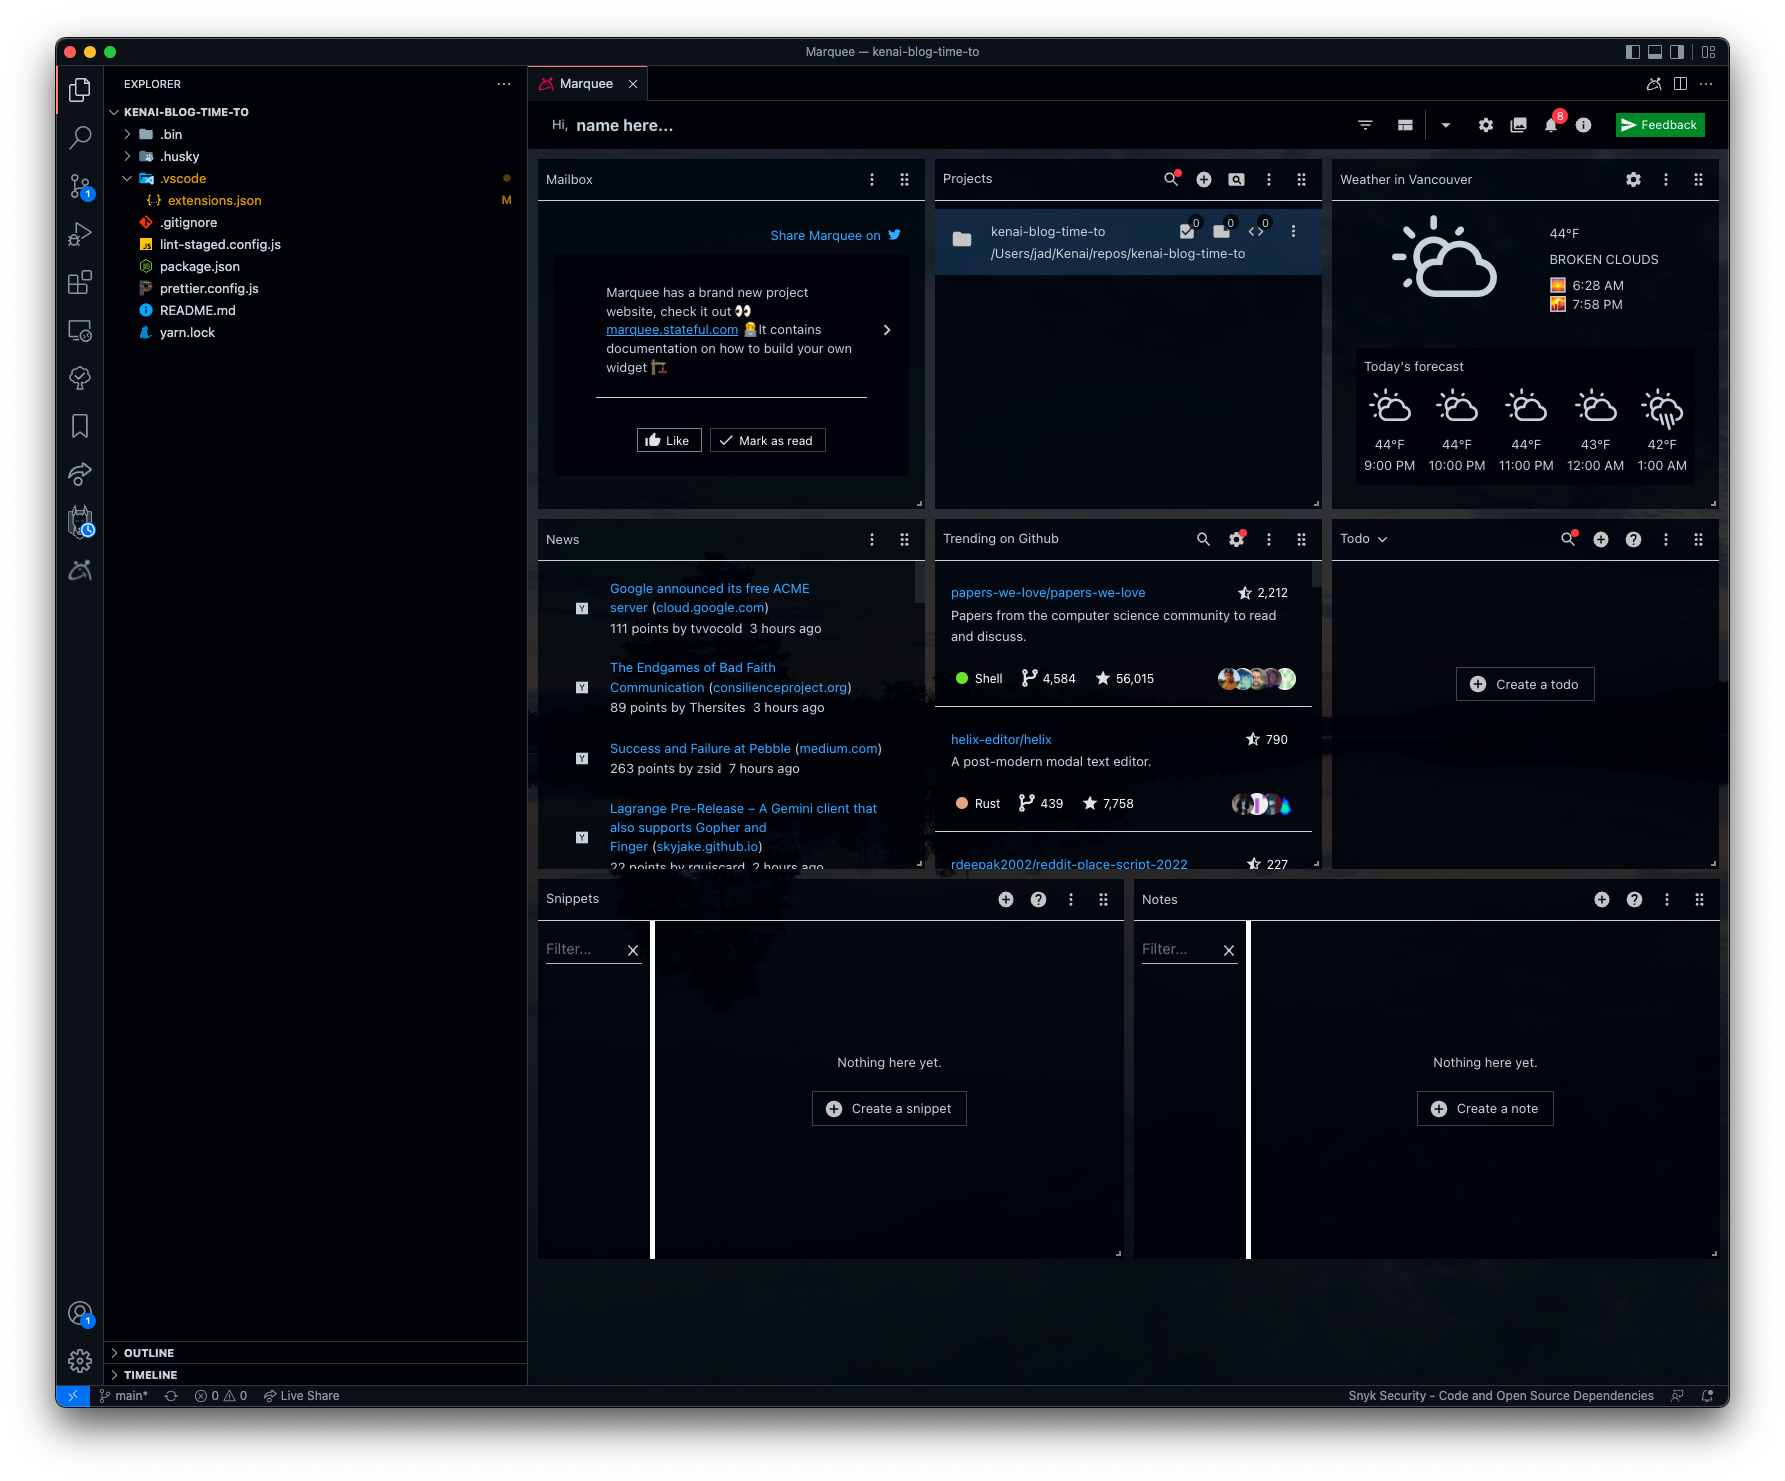
- Marquee
- Marquee replaces the standard VS Code landing page. It adds some productivity features such as quick access to your projects, TODOs, code snippets, notes, and some less productive features like news and weather. The content added to Marquee will not be committed to the repository and is rather a local resource per developer.
- Bookmarks
- This one is particularly useful when jumping between related code that may be in different files or be separated by many many lines of other code. It lets you set bookmarks at any line in your code, provides a central view of all your bookmarks, and has shortcuts to quickly jump between bookmarks.
- Todo Tree
- Aggregates all TODOs found within the codebase into a single tree view.
😎 Collaboration
- Live Share
- This allows for developers to create a collaborative coding session, where other developers can be invited to work on the same codebase, either in parallel, or together when pair programming. You will be able to view where each user is in the codebase, watch them live as they make edits, and also allows for a terminal session to be shared.
- There is an additional extension available that allows for an audio share in the live share session, however, we are typically on a Teams or Discord call when collaborating so have not had the need to try this out.
🥰 Cause we like shiny things
- GitHub Theme
- We spend a lot of our time looking at code on GitHub, so getting a similar look and feel in VS Code helps with a sense of familiarity.
- This one has both light and dark themes packed in with a variety of contrast levels.
- Material Icon Theme
- This icon theme is clean and has icons for a substantially large variety of file and folder types.
🚀 Bonus Extension

A few of us have been lucky enough to have received access to the technical preview of GitHub Copilot. It is an AI-driven code completion companion that learns from your codebase and makes intelligent suggestions on how to complete your code based on similar patterns, or descriptive comments.
We haven’t included this in the baseline recommendations as if someone does not yet have access it would just add bloat to the installed extensions unnecessarily.
If you are interested and have not yet gotten access, do yourself a favour and sign up for the technical preview here. We seemed to receive it at random intervals so unfortunately, we can’t indicate when you should receive access, but just know when you do, it's an awesome experience! Just don’t expect it to write production-grade code for your entire application, you will still need to sense check, optimize and harden the output it recommends. What it has proven to be excellent at is recommending new ways of tackling problems leading to a lot of on-the-fly learning as we code.
Configuring the Snyk extension
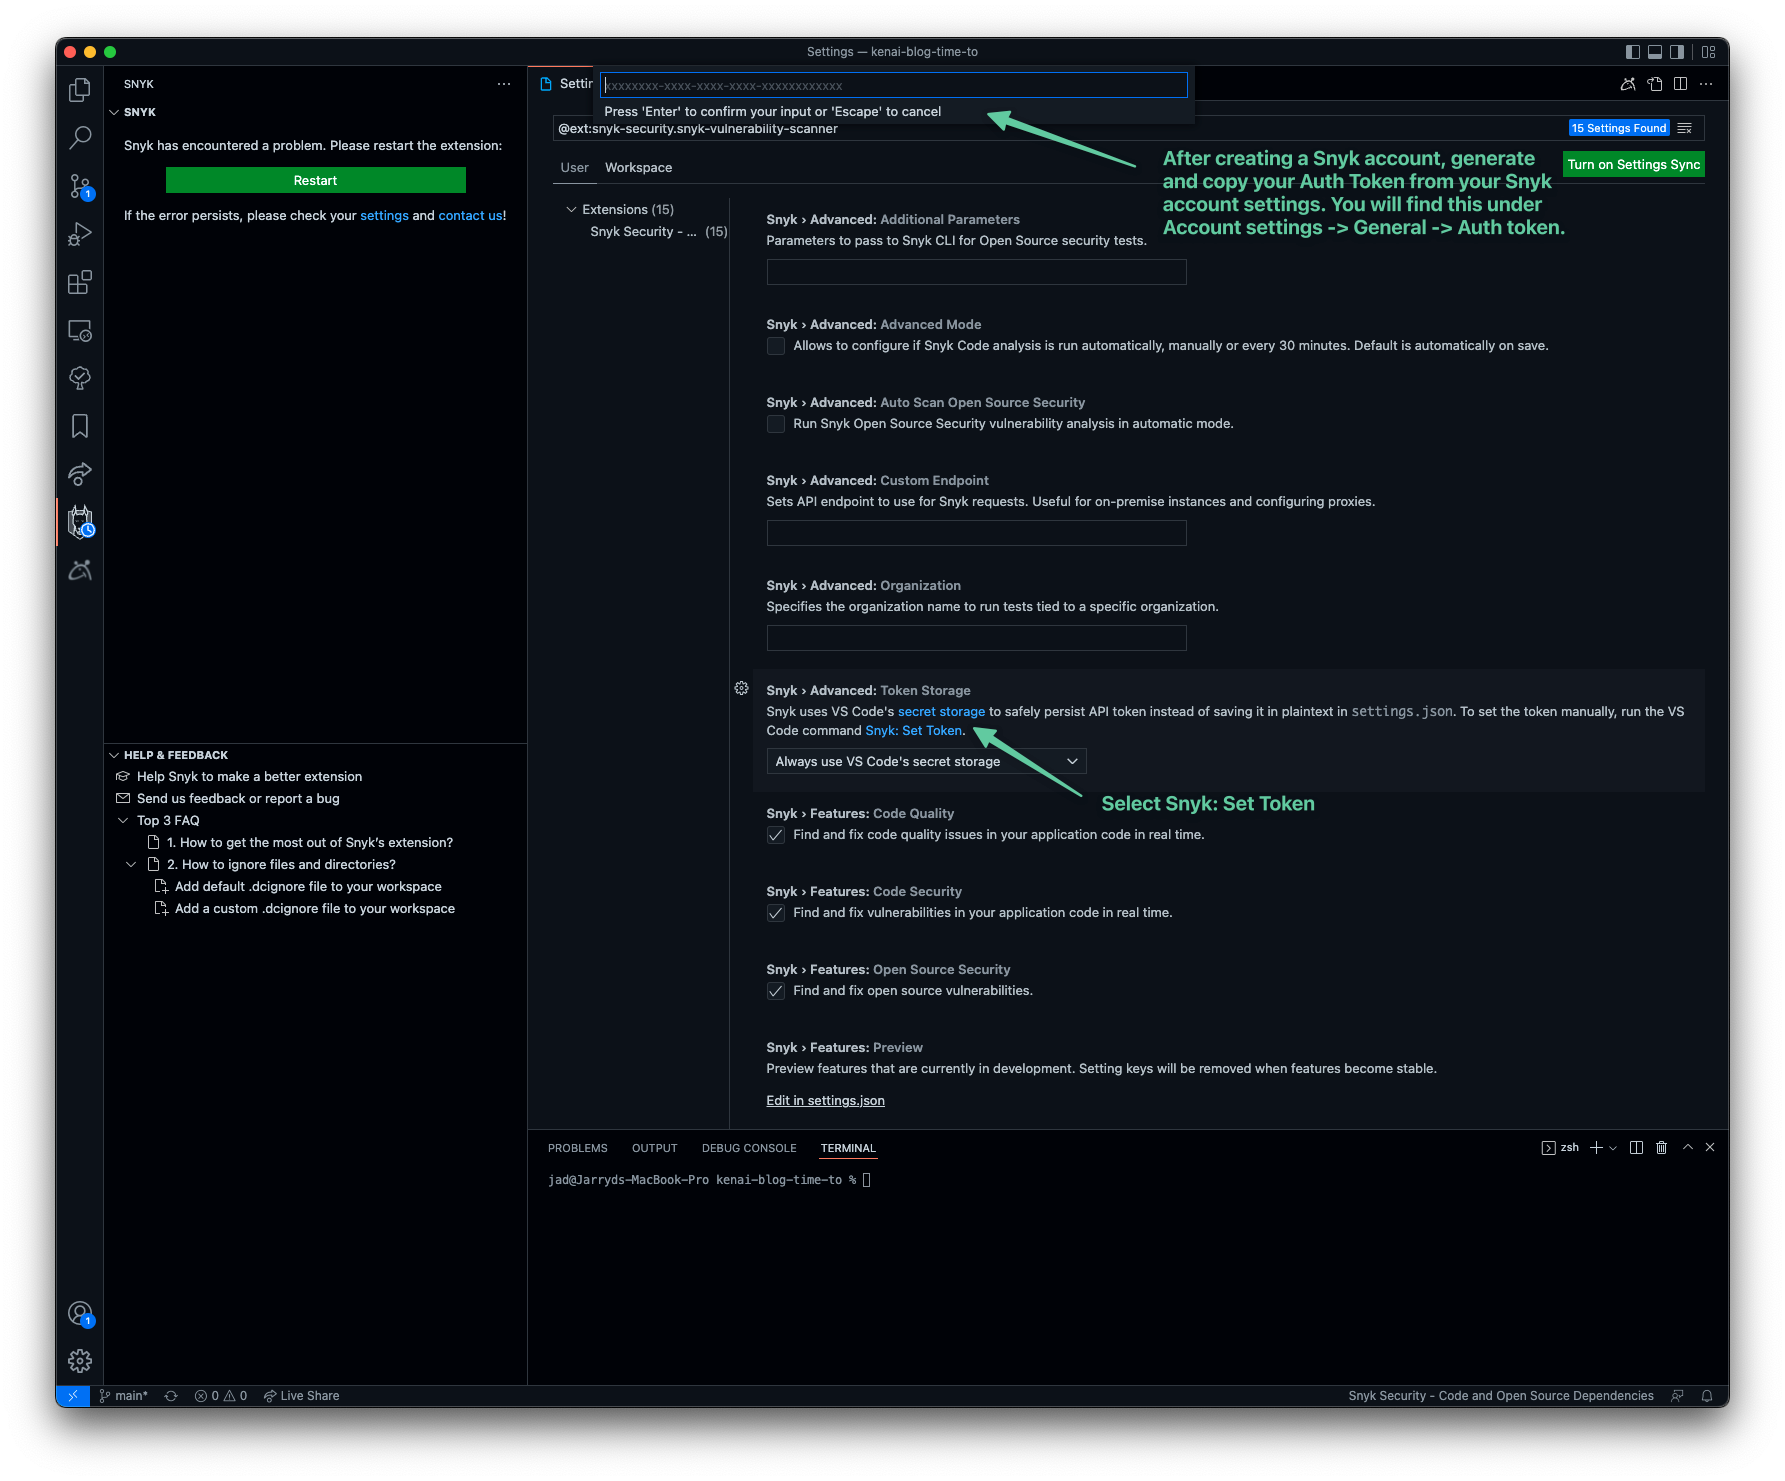
You may notice Snyk may indicating that it has encountered a problem and you should restart the extension. This is most likely due to it not having an Auth token and restarting will not solve the problem in this case.
To solve this, create your free Snyk account, generate an Auth token and follow the steps in the screenshot below to activate it.
Once activated you should now see the results of the code analysis. As you can see we have already been alerted to a vulnerability in one of our dependencies. This is a proof of concept exploit on an indirect dependency of our direct ESLint dependency. Snyk provides a window within VS Code with a detailed description of the vulnerability which can then be reviewed to facilitate the remediation priority and action plan.


Luckily for us, this is a brand new codebase so updating the affected dependency is low risk. After updating the ESLint package to its latest version and re-running the Snyk scan, we now have a clean bill of health. There’s nothing like a list filled with green ticks to get you a good night's sleep.

Local Development Environment
A critical aspect of getting started in a new codebase is the setup and alignment of the individual developers' local development environment. While this may be trivial with a simple and immature codebase with few technologies and limited dependencies, this can get quite complex to deal with as it matures with a multitude of technologies, or when one is working on multiple codebases leveraging the same technology, but locked to different versions.
It doesn’t help that we have a shiny new code editor if our code behaves differently on our local machine versus production. To help us avoid this, VS Code has a popular plugin developed by Microsoft themselves called Remote - Containers, which is still in preview, but we have found it to work like a charm in this regard. Microsoft has done a detailed write-up of the inner workings which you can find in the remote-container docs.
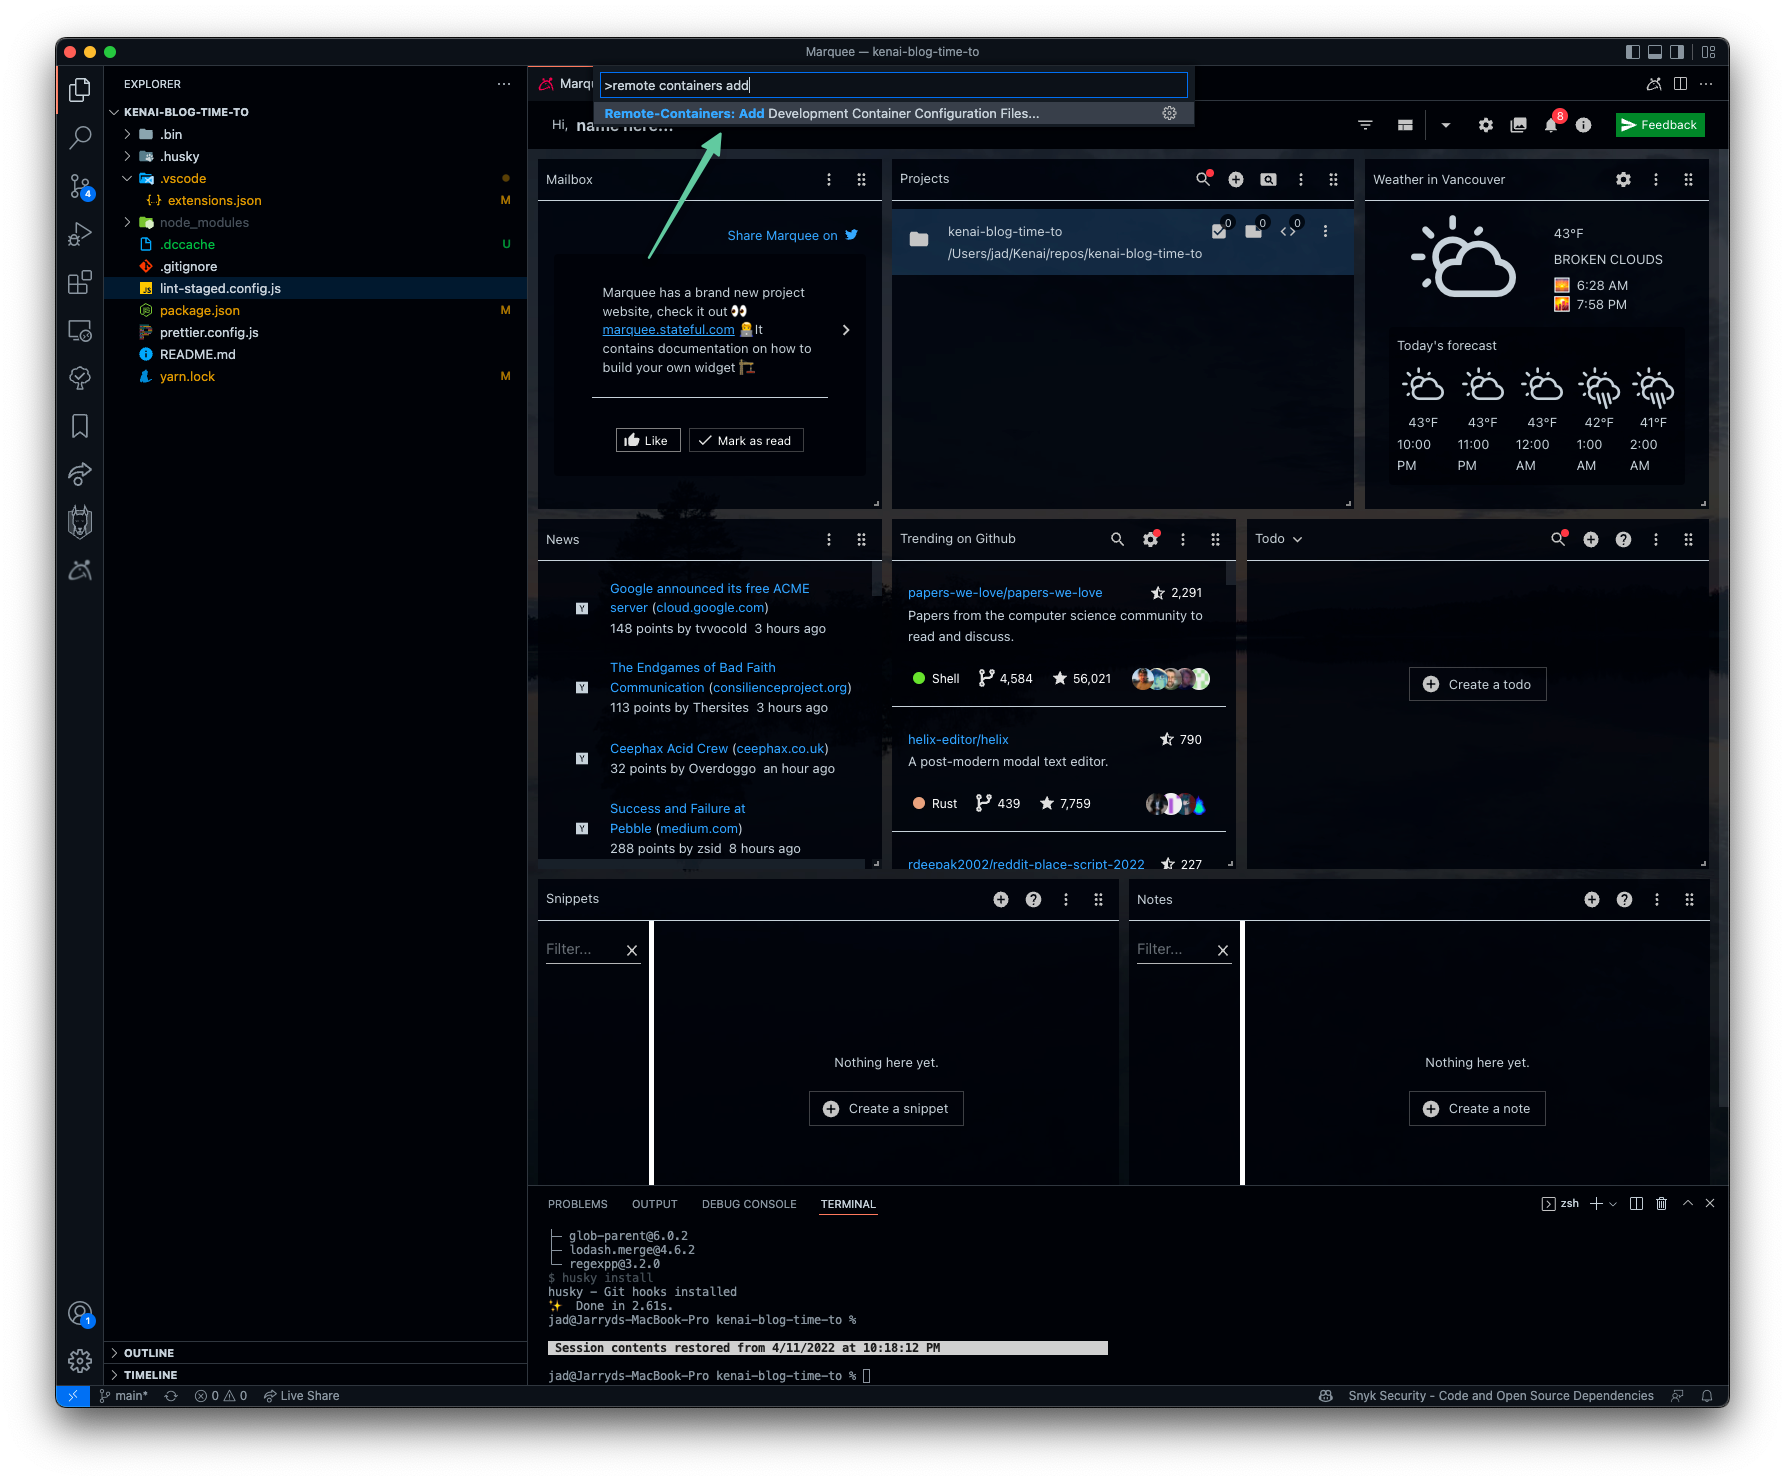
Add remote container configuration files
To get started, since we already have the extension installed from the recommendations, we can access the command palette with ctrl + shift + p (Windows & Linux) or cmd + shift + p (mac). The command palette lets you execute commands within VS Code with expanded functionality based on the extensions that are installed.
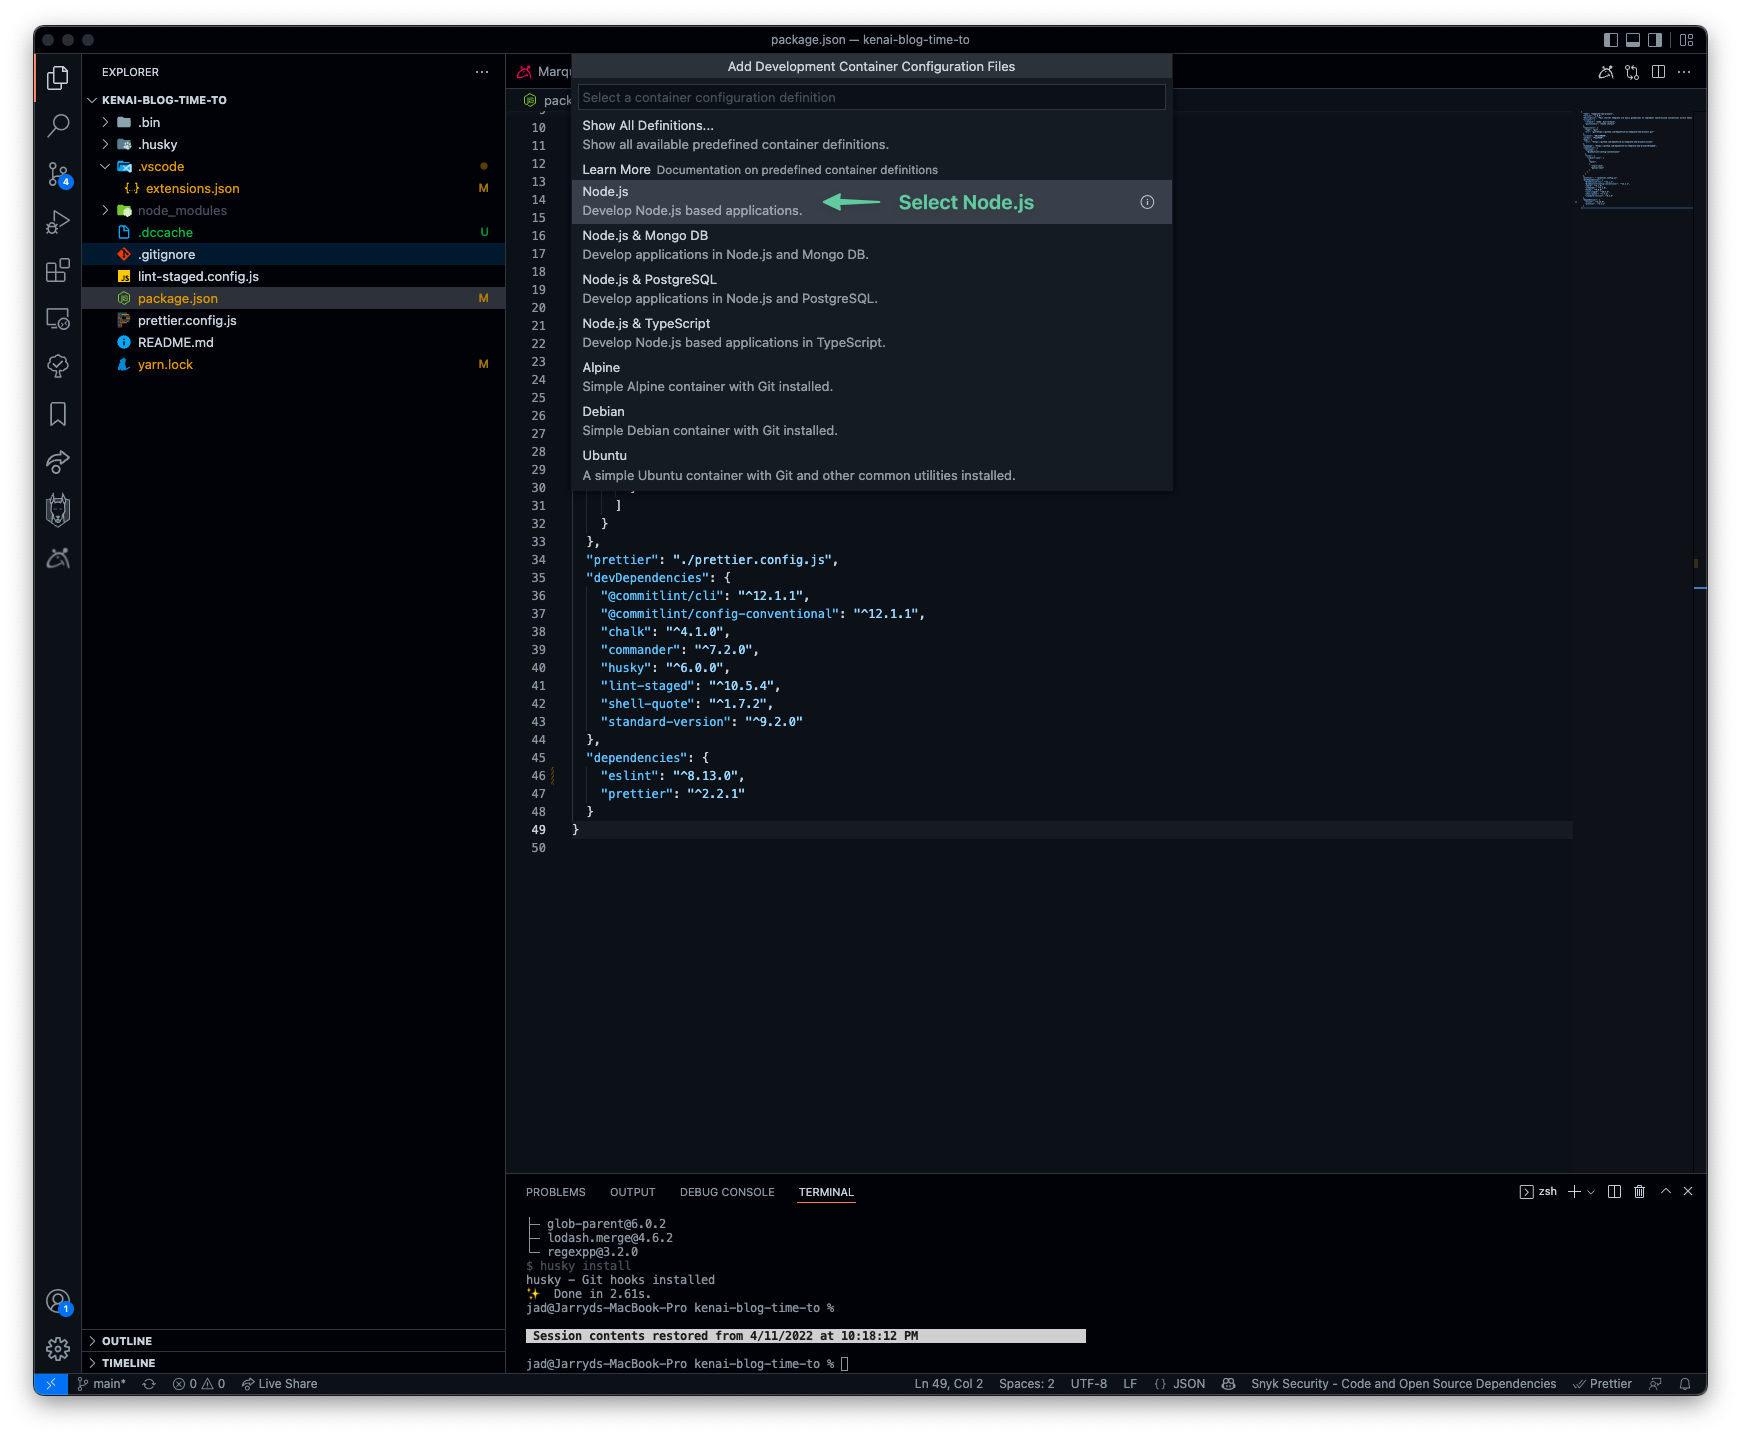
At the next prompt, you will be able to select from a variety of predefined containers. For our purposes select the Node.js option.
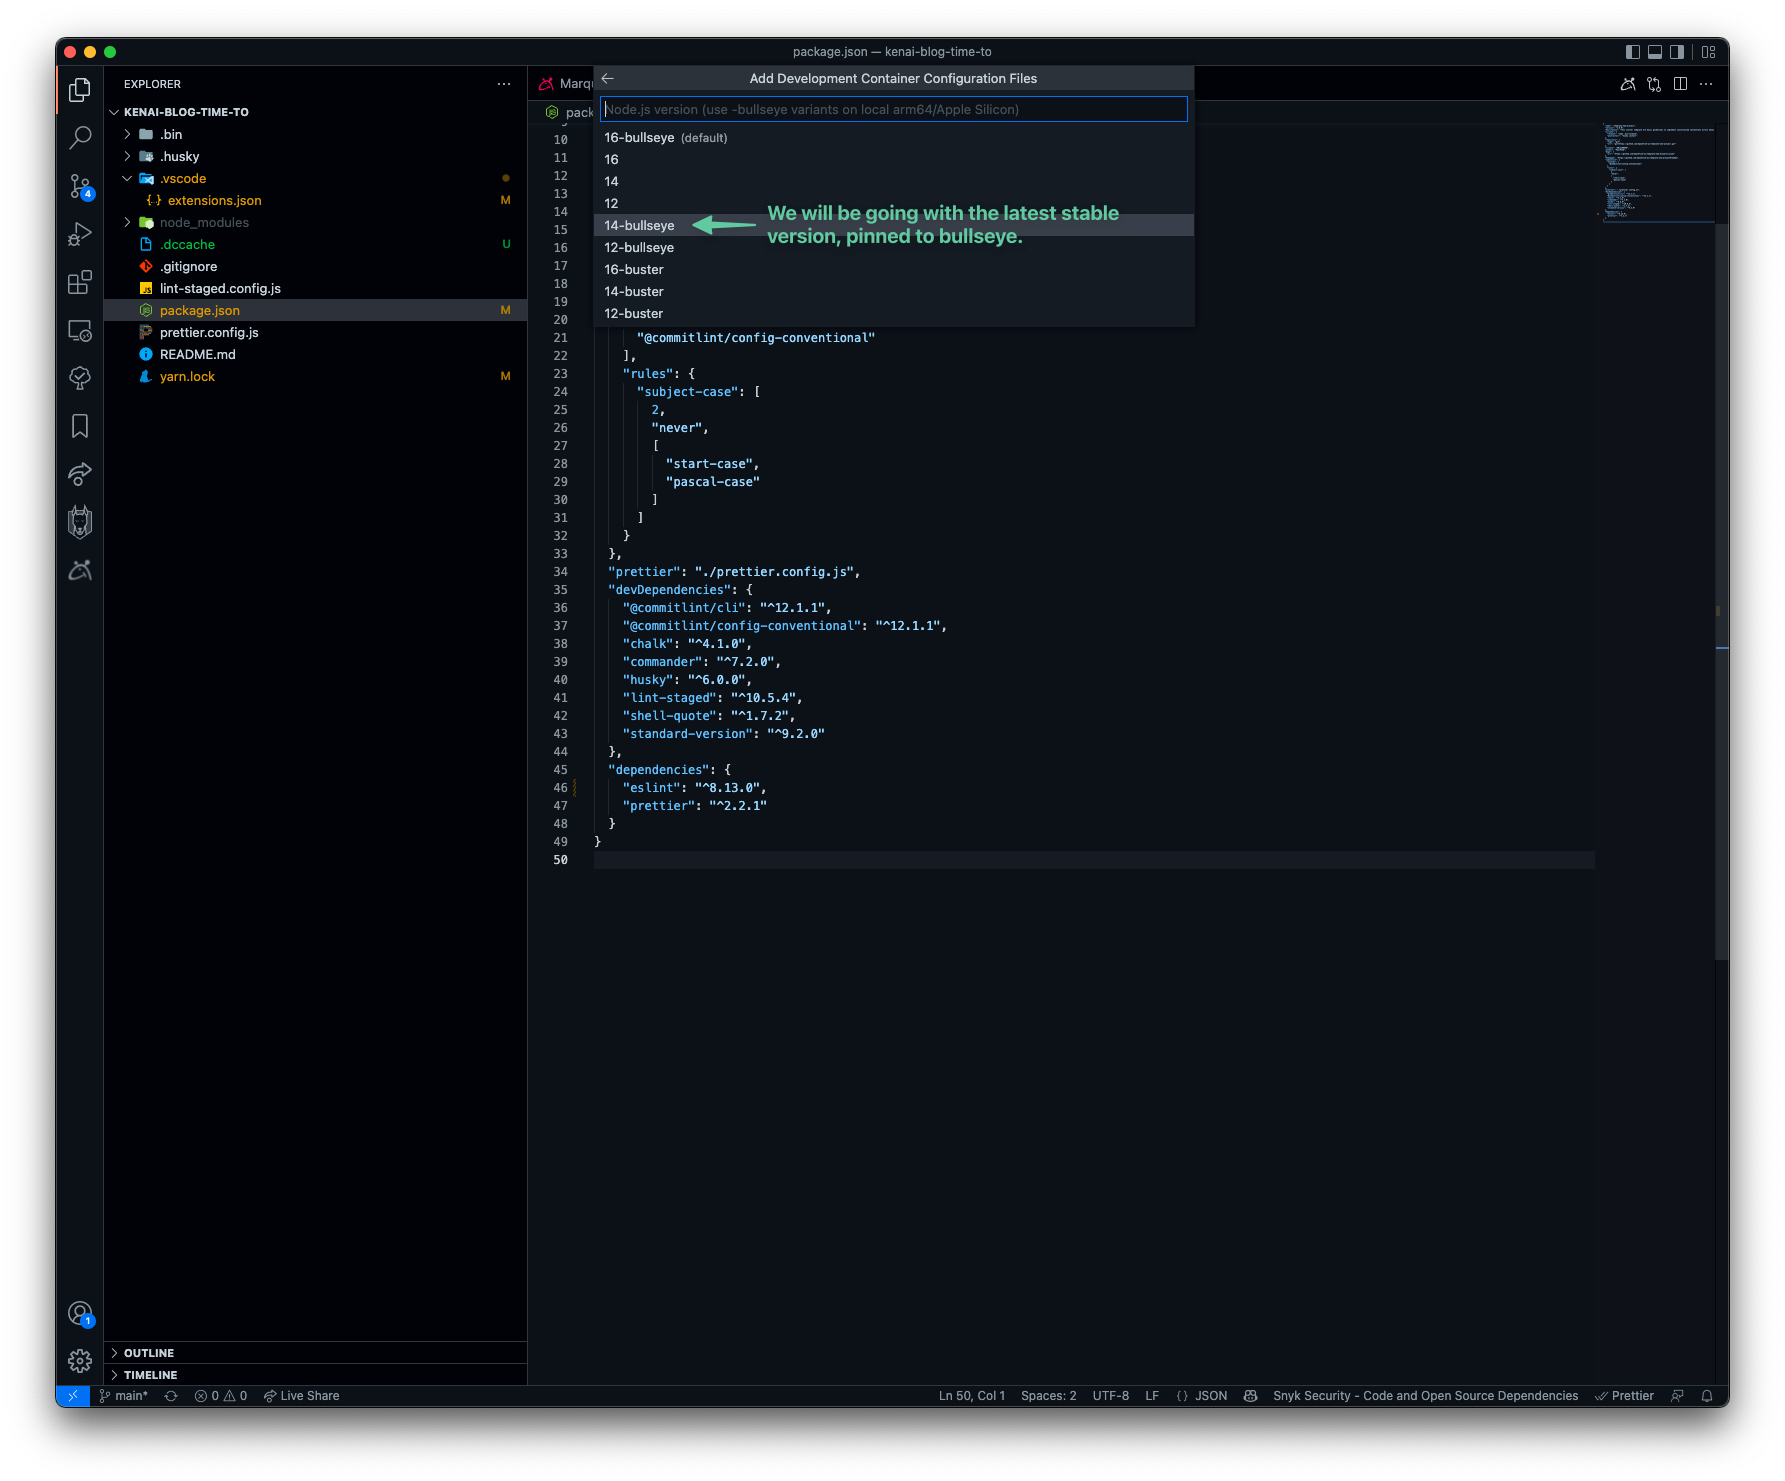
Now we choose the specific version of Node.js. We will be sticking with version 14, however, as you can see there are a few variations of version 14 we get to pick from. Each of these containers is based on a Debian release with the suffix referring to the release version.
- 14: Resolves to the latest stable version of Debian
- 14-bullseye: Pinned to the bullseye Debian release (latest stable release at the time of writing)
- 14-buster: Pinned to the buster Debian release
The option of 14 without a suffix will resolve to the latest stable version of Debian, so if a new stable version of Debian is released, this container could be updated. To prevent any unexpected behaviour in the case of an uncontrolled update, you can select one of the suffixed options to pin the Debian release version until you are ready to update.
We will be going with 14-bullseye, and just a note for those of you running ARM based machines such as the MacBook’s with M1 chips, this is the recommended container version.
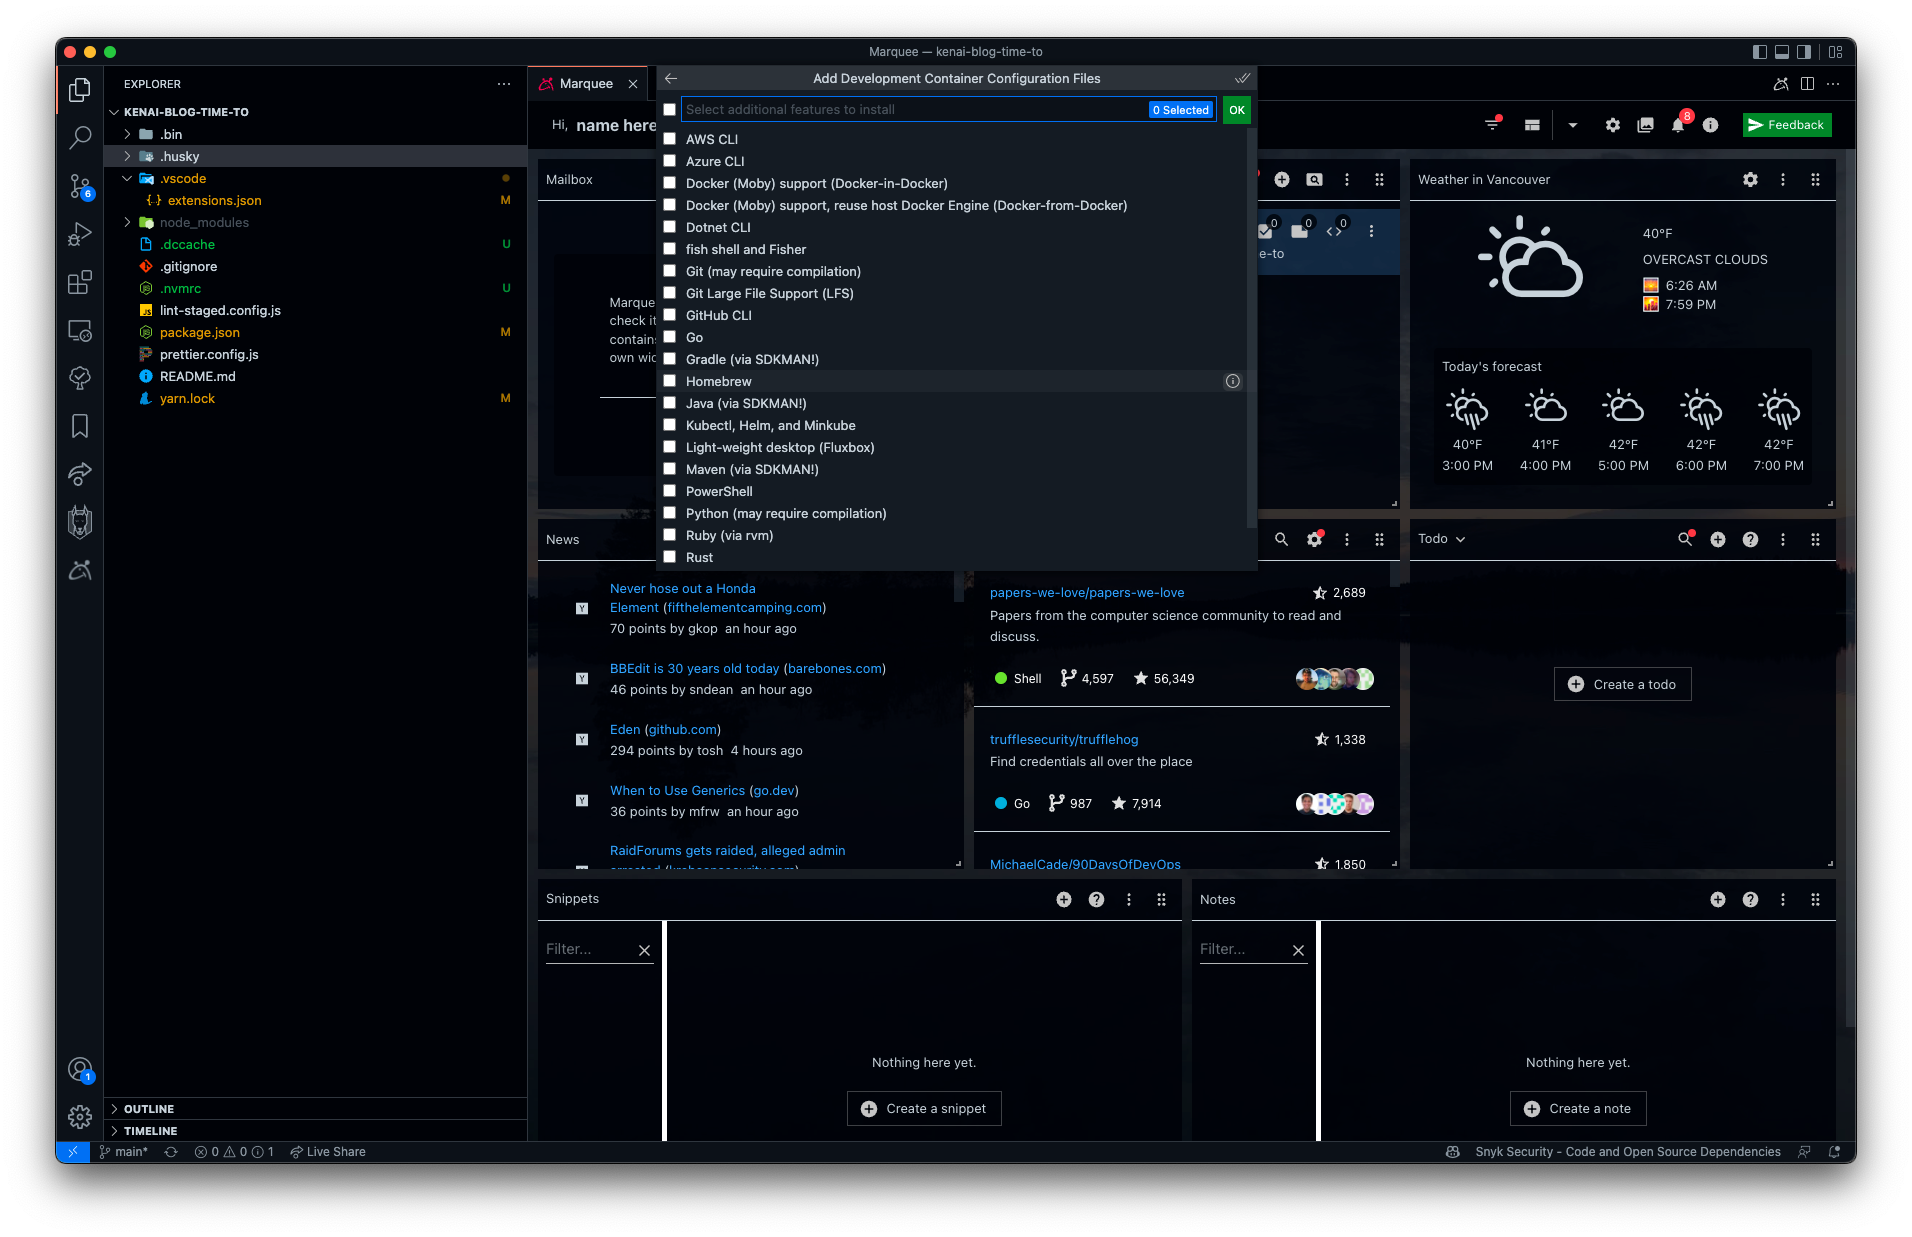
Once the version is selected, we have the option to add some additional features. The base container image we have chosen has everything needed, for now, so we will not select any of these.
Once complete, a new .devcontainer folder will have been added to the root of the repository, containing 2 files:
- devcontainer.json: Configuration file for the access and creation of the dev container. You can read more in the reference documentation.
- Dockerfile: The Dockerfile defining the contents of the dev container.
|-- .devcontainer
    |-- devcontainer.json
    |-- Dockerfile
Customize the remote container configuration files
Before building and connecting to the dev container, we are going to customize some configurations to further reduce the number of steps needed to get started.
Add extensions to be automatically installed within the dev container
Some VS Code extensions should be installed within the dev container even if they are already installed in your local VS Code. We can specify which extensions should be installed in the container by adding them to the extensions property in the .devcontainer.json file.
For now, we will add all of the extensions we included in our extensions.json file, but as we will cover later, this can be optimized to remove unnecessary bloat.
//.devcontainer
"extensions": [
	"ms-vscode-remote.remote-containers",
	"snyk-security.snyk-vulnerability-scanner",
	"wix.vscode-import-cost",
	"dbaeumer.vscode-eslint",
	"esbenp.prettier-vscode",
	"aaron-bond.better-comments",
	"stateful.marquee",
	"alefragnani.Bookmarks",
	"Gruntfuggly.todo-tree",
	"MS-vsliveshare.vsliveshare",
	"GitHub.github-vscode-theme",
	"PKief.material-icon-theme"
],
Execute commands after the creation of the container
We can automate the execution of some commands after the creation of the dev container by customizing the postCreateCommand property in the .devcontainer.json file. We will leverage this to install npm and yarn globally at a specified version as well as run the initial yarn install at the project root.
Installing a specific version of npm and yarn will further eliminate the potential for drift in environment configuration between developers.
"postCreateCommand": "npm install -g [email protected] && npm install -g [email protected] && yarn install"Configure .dockerignore
It can be useful to exclude some files & folders from our workspace being mounted into the dev container. A good example would be our node_modules. Specifically, in the case of packages that have OS-specific variations, we want to ensure that the node_modules installed in the dev container align with the container OS, so we do not want to copy these across. This can be done through a .dockerignore file which works similarly to a .gitignore file. The .devcontainer folder now looks like this:
|-- .devcontainer
    |-- .dockerignore
    |-- devcontainer.json
    |-- Dockerfile
With the .dockerignore file containing a single line:
//.dockerignore
node_modules
Control exact Node.js versions
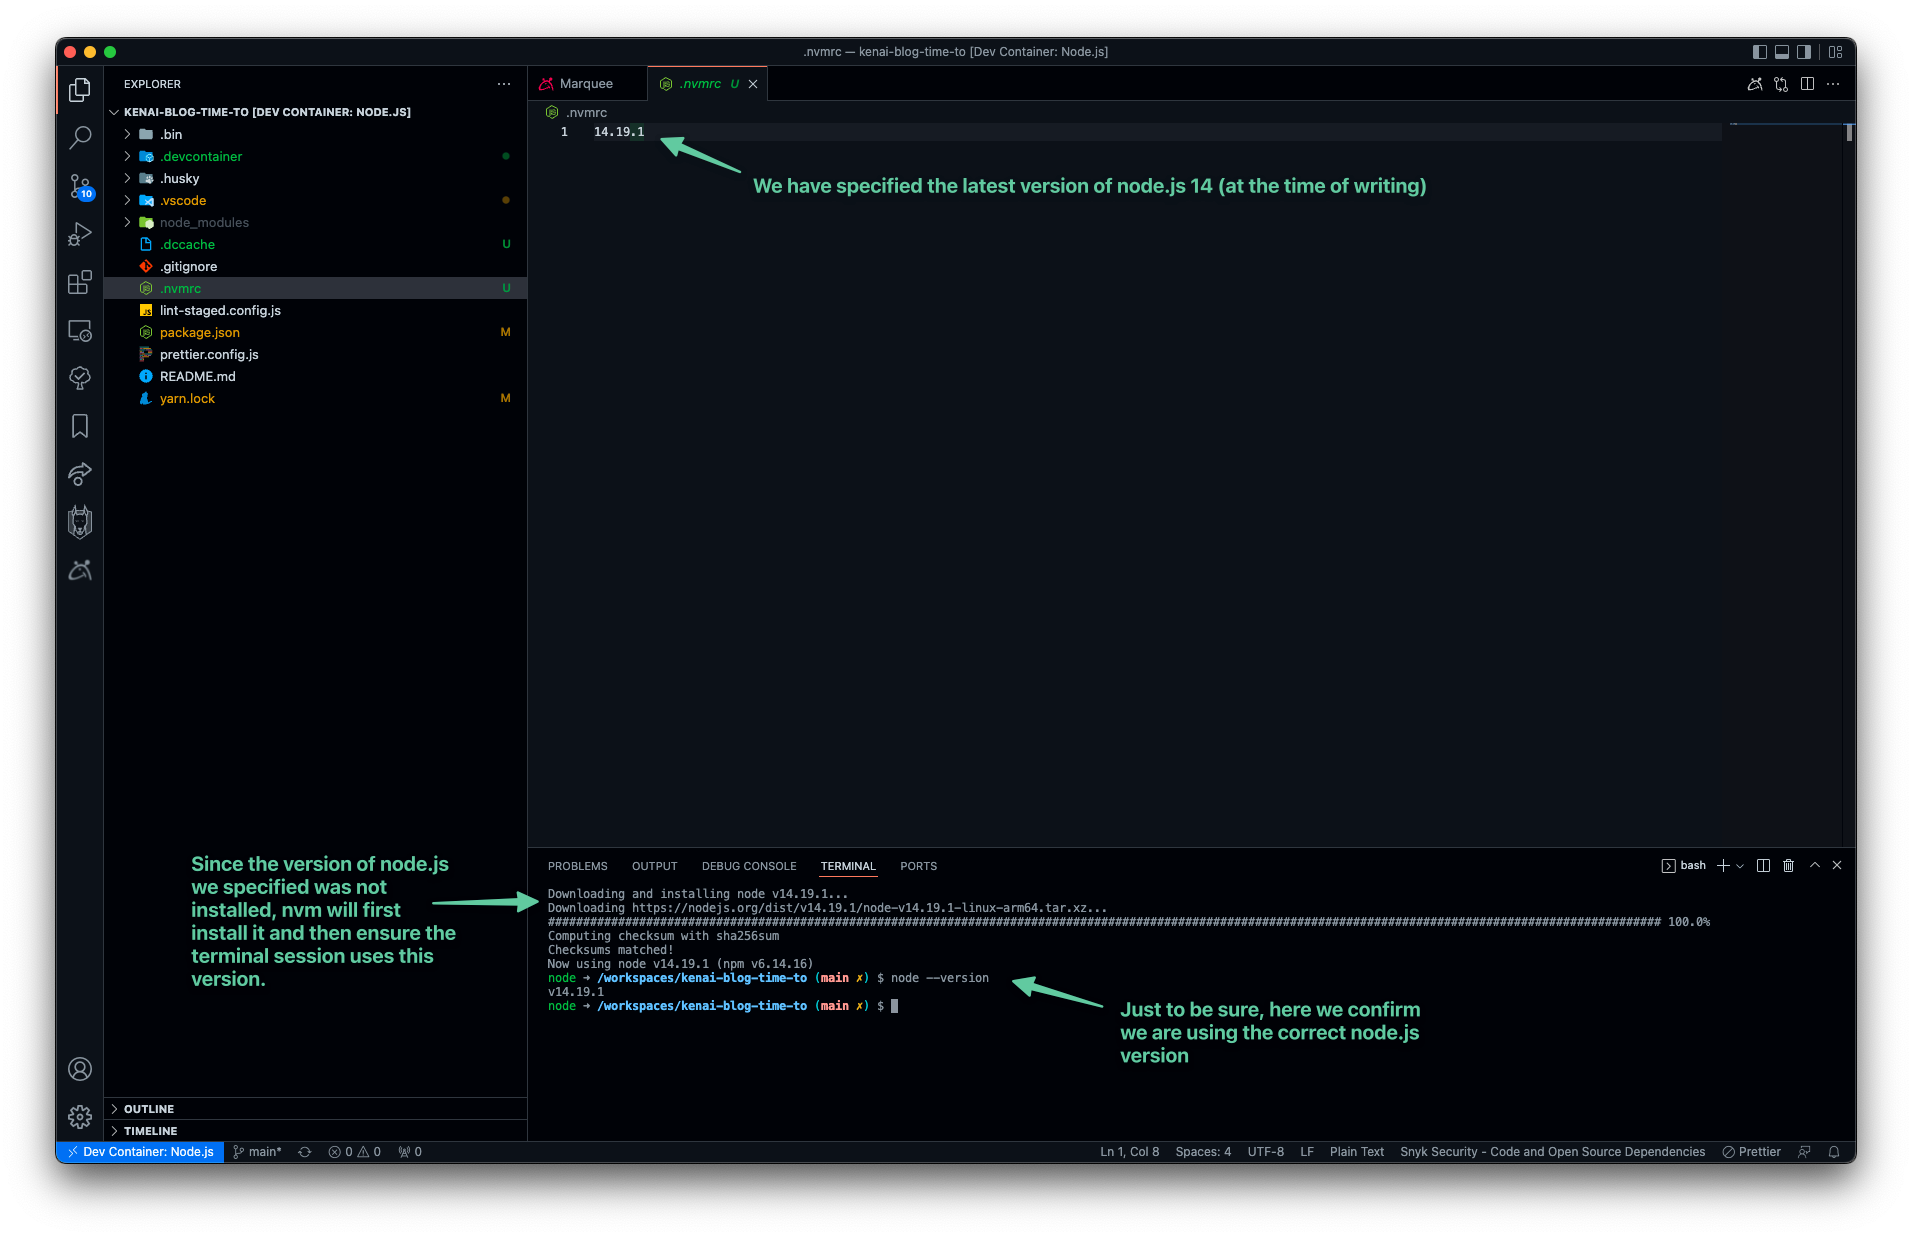
We have selected the 14-bullseye variation of the container image. This will ensure we have Node.js 14 installed in the container, but it does not specify the minor version. To ensure consistency across all environments, we want to be able to control the Node.js version down to the minor version.
Conveniently the selected container image comes with nvm installed. nvm is a Node.js package manager that makes it easy to install and switch between different versions of Node.js.
We can also add a .nvmrc file at the root of our repo to specify the version of Node.js that should be used when working in this codebase. This clarifies the version of Node.js that should be used with this codebase regardless of whether developing within dev container or just in a local environment.
We can go a step further and automatically detect a .nvmrc file, install the version if it is not installed and then switch the shell session to use the specified Node.js version. This can be done by customizing the .bashrc (or .zshrc) configuration.
Extend default bash aliases in the dev container
The nvm docs provide us with a .bashrc configuration that will allow us to alias the cd command to automatically detect .nvmrc files, automatically install and then switch to the correct Node.js version when a terminal session changes directory to a directory including a .nvmrc file.
To modify the .bashrc file in the dev container as part of the container build process, we can modify the Dockerfile as follows.
1. We will add a new file called bashrc-extension to the dev container folder, and copy the code provided in the nvm README to this file.
# enables nvm to detect if there is an .nvmrc, if it finds it,
# then it should switch the configured version:
# https://github.com/nvm-sh/nvm#nvmrc
cdnvm() {
    cd "$@";
    nvm_path=$(nvm_find_up .nvmrc | tr -d '\n')

    # If there are no .nvmrc file, use the default nvm version
    if [[ ! $nvm_path = *[^[:space:]]* ]]; then

        declare default_version;
        default_version=$(nvm version default);

        # If there is no default version, set it to `node`
        # This will use the latest version on your machine
        if [[ $default_version == "N/A" ]]; then
            nvm alias default node;
            default_version=$(nvm version default);
        fi

        # If the current version is not the default version, set it to use the default version
        if [[ $(nvm current) != "$default_version" ]]; then
            nvm use default;
        fi

        elif [[ -s $nvm_path/.nvmrc && -r $nvm_path/.nvmrc ]]; then
        declare nvm_version
        nvm_version=$(<"$nvm_path"/.nvmrc)

        declare locally_resolved_nvm_version
        # `nvm ls` will check all locally-available versions
        # If there are multiple matching versions, take the latest one
        # Remove the `->` and `*` characters and spaces
        # `locally_resolved_nvm_version` will be `N/A` if no local versions are found
        locally_resolved_nvm_version=$(nvm ls --no-colors "$nvm_version" | tail -1 | tr -d '\->*' | tr -d '[:space:]')

        # If it is not already installed, install it
        # `nvm install` will implicitly use the newly-installed version
        if [[ "$locally_resolved_nvm_version" == "N/A" ]]; then
            nvm install "$nvm_version";
        elif [[ $(nvm current) != "$locally_resolved_nvm_version" ]]; then
            nvm use "$nvm_version";
        fi
    fi
}
alias cd='cdnvm'
cd $PWD
You can add the same code to the .bashrc or .zshrc on your local machine to automatically switch your terminal session to the node.js version specified in the .nvmrc file.
2. Add the following commands to the end of our Dockerfile
# Extend the base .bashrc with custom settings
COPY bashrc-extension /home/node/bashrc-extension
RUN cat /home/node/bashrc-extension >> /home/node/.bashrc
This will copy the bashrc-extension file to the devcontainer and append its contents to the default .bashrc file.
Our final .devcontainer folder structure now looks like this:
|-- .devcontainer
    |-- .dockerignore
    |-- bashrc-extension
    |-- devcontainer.json
    |-- Dockerfile
This mechanism can be used to add your own custom aliases, or merge your current .bashrc configuration to the docker container.
Build & connect to the dev container
Now that we have initialized and configured our dev container files, we can build and connect to the dev container to test out the development environment tailored for this repository.
There are a few ways to build and open our workspace in a dev container, a few of them are summarised in the screenshot provided below.
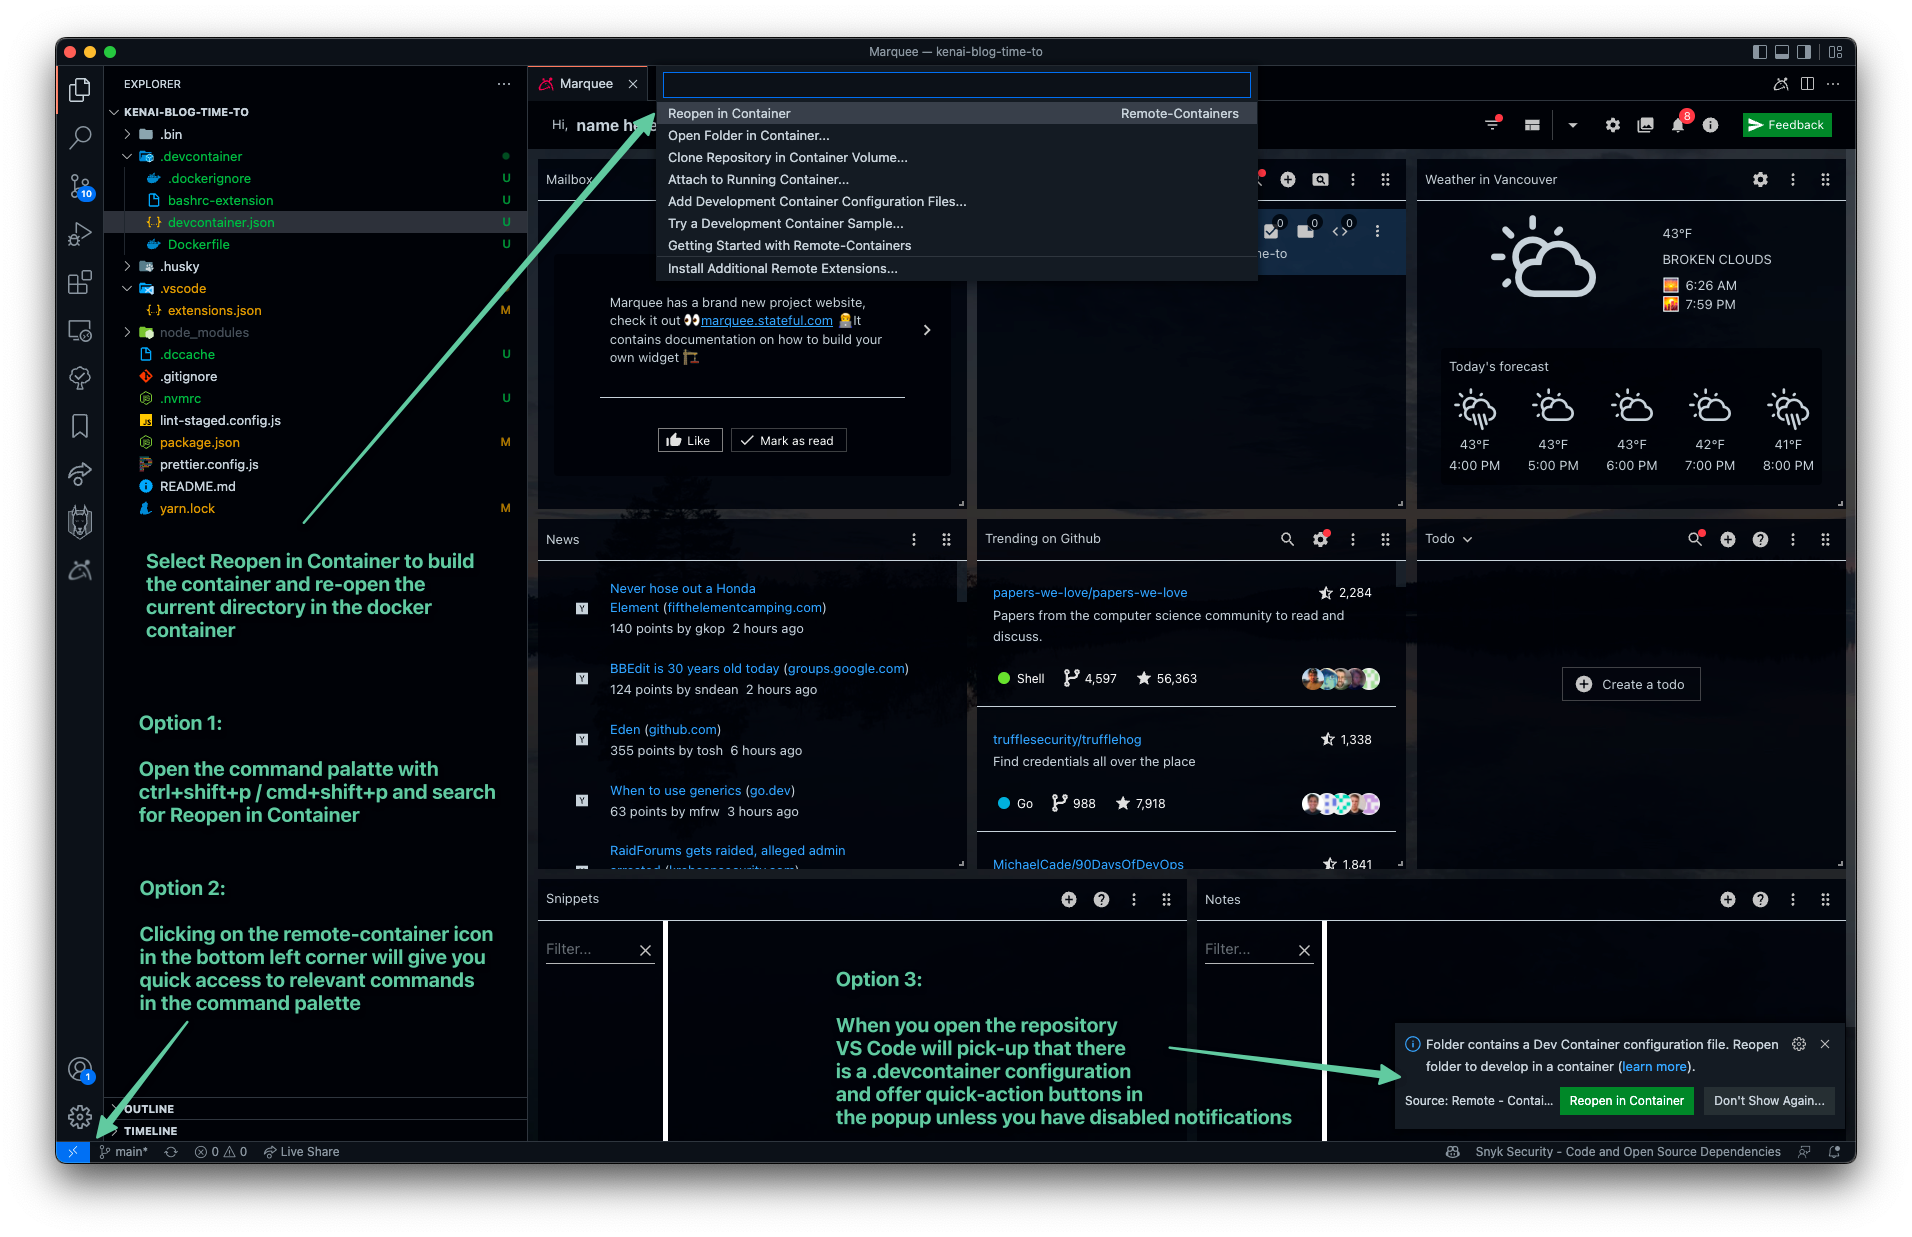
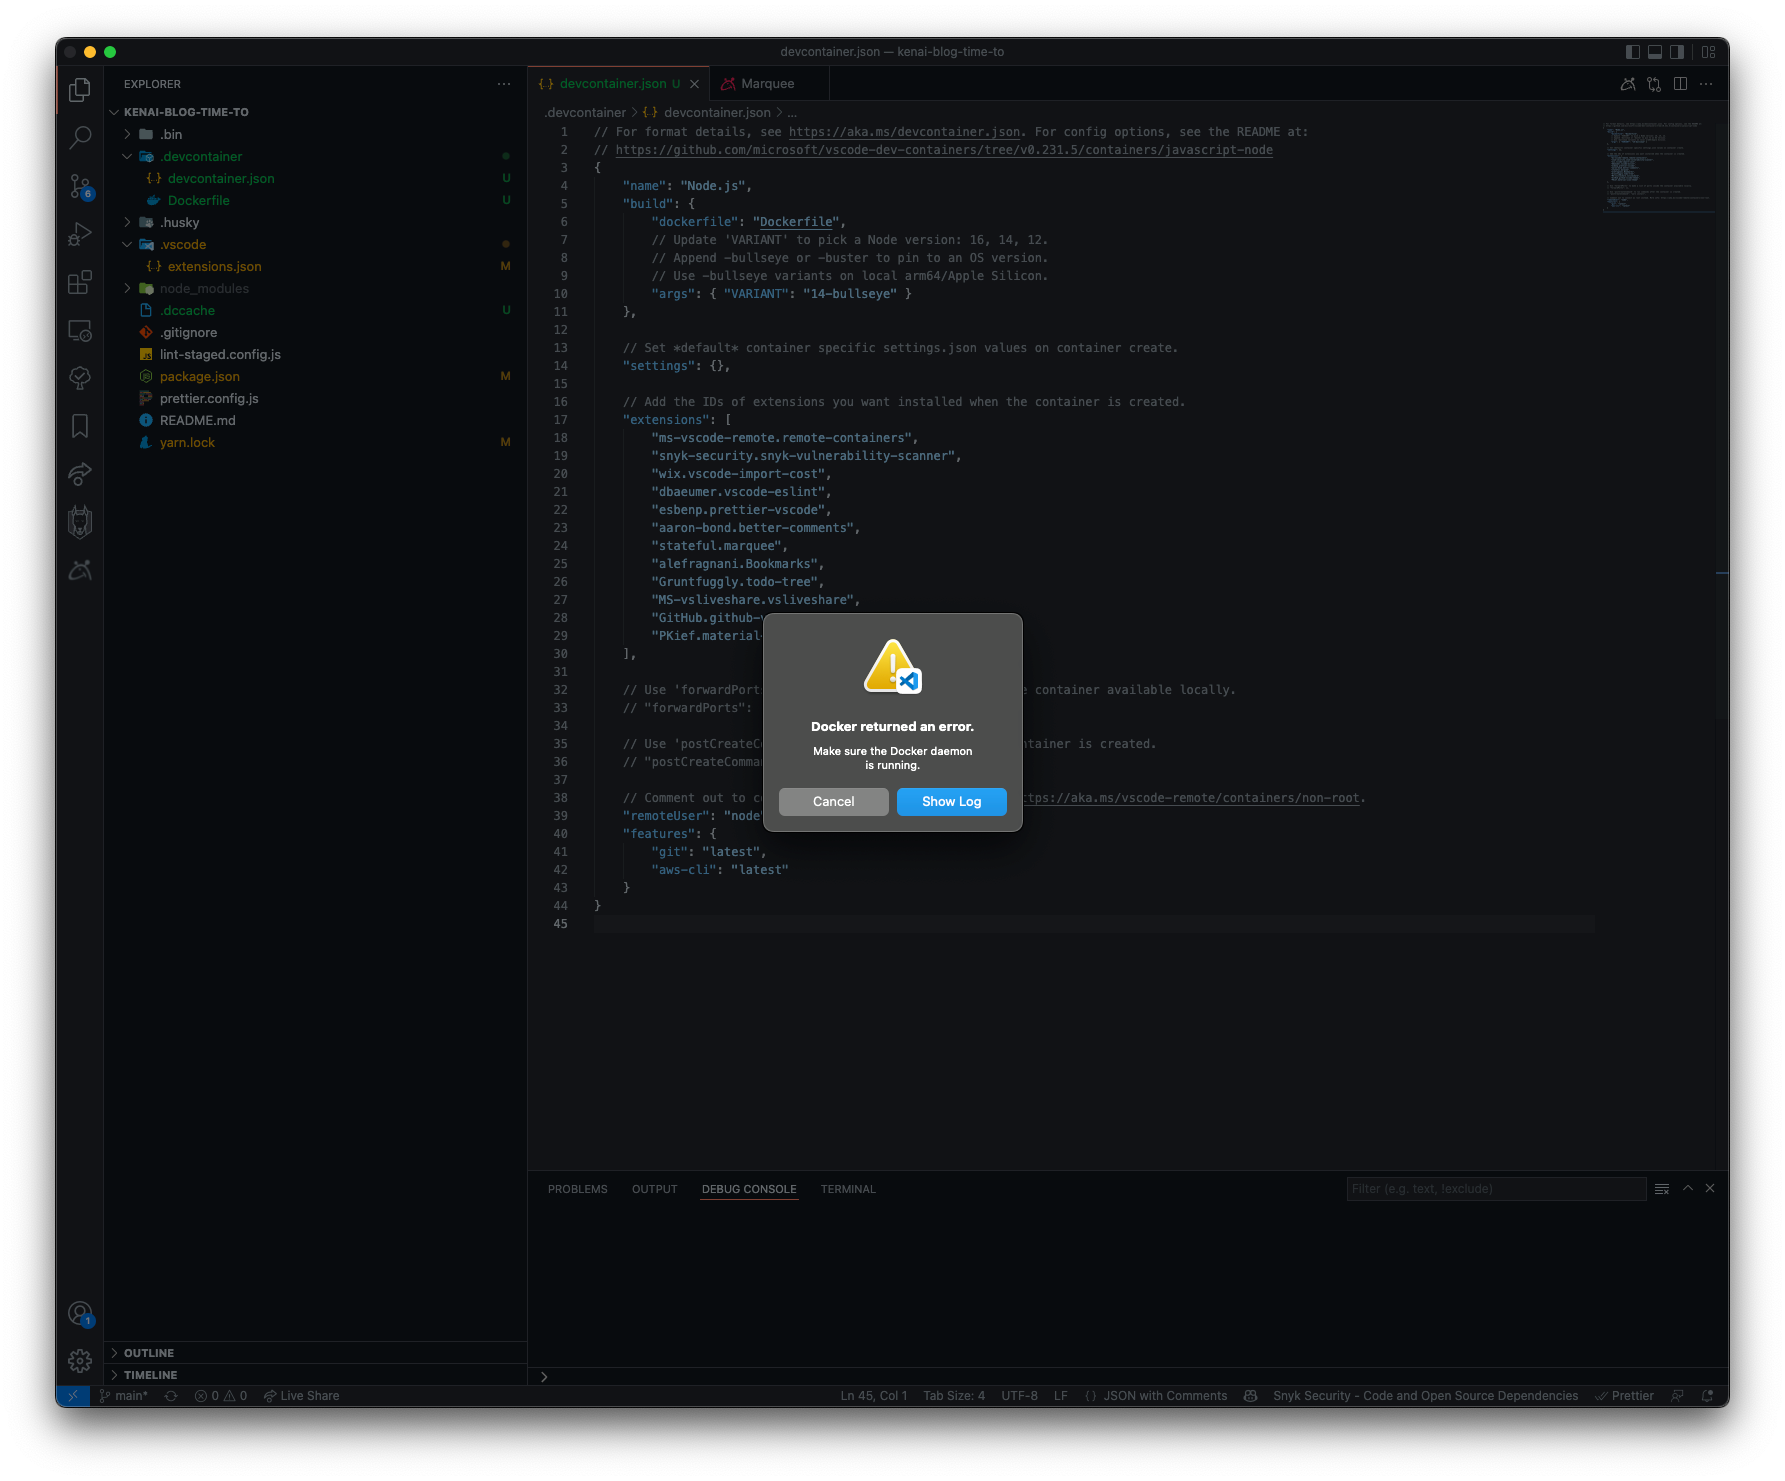
If you do not already have docker installed or if it is currently not running, an error will appear as shown below. To install docker, you can follow the official docker installation guide for your operating system.
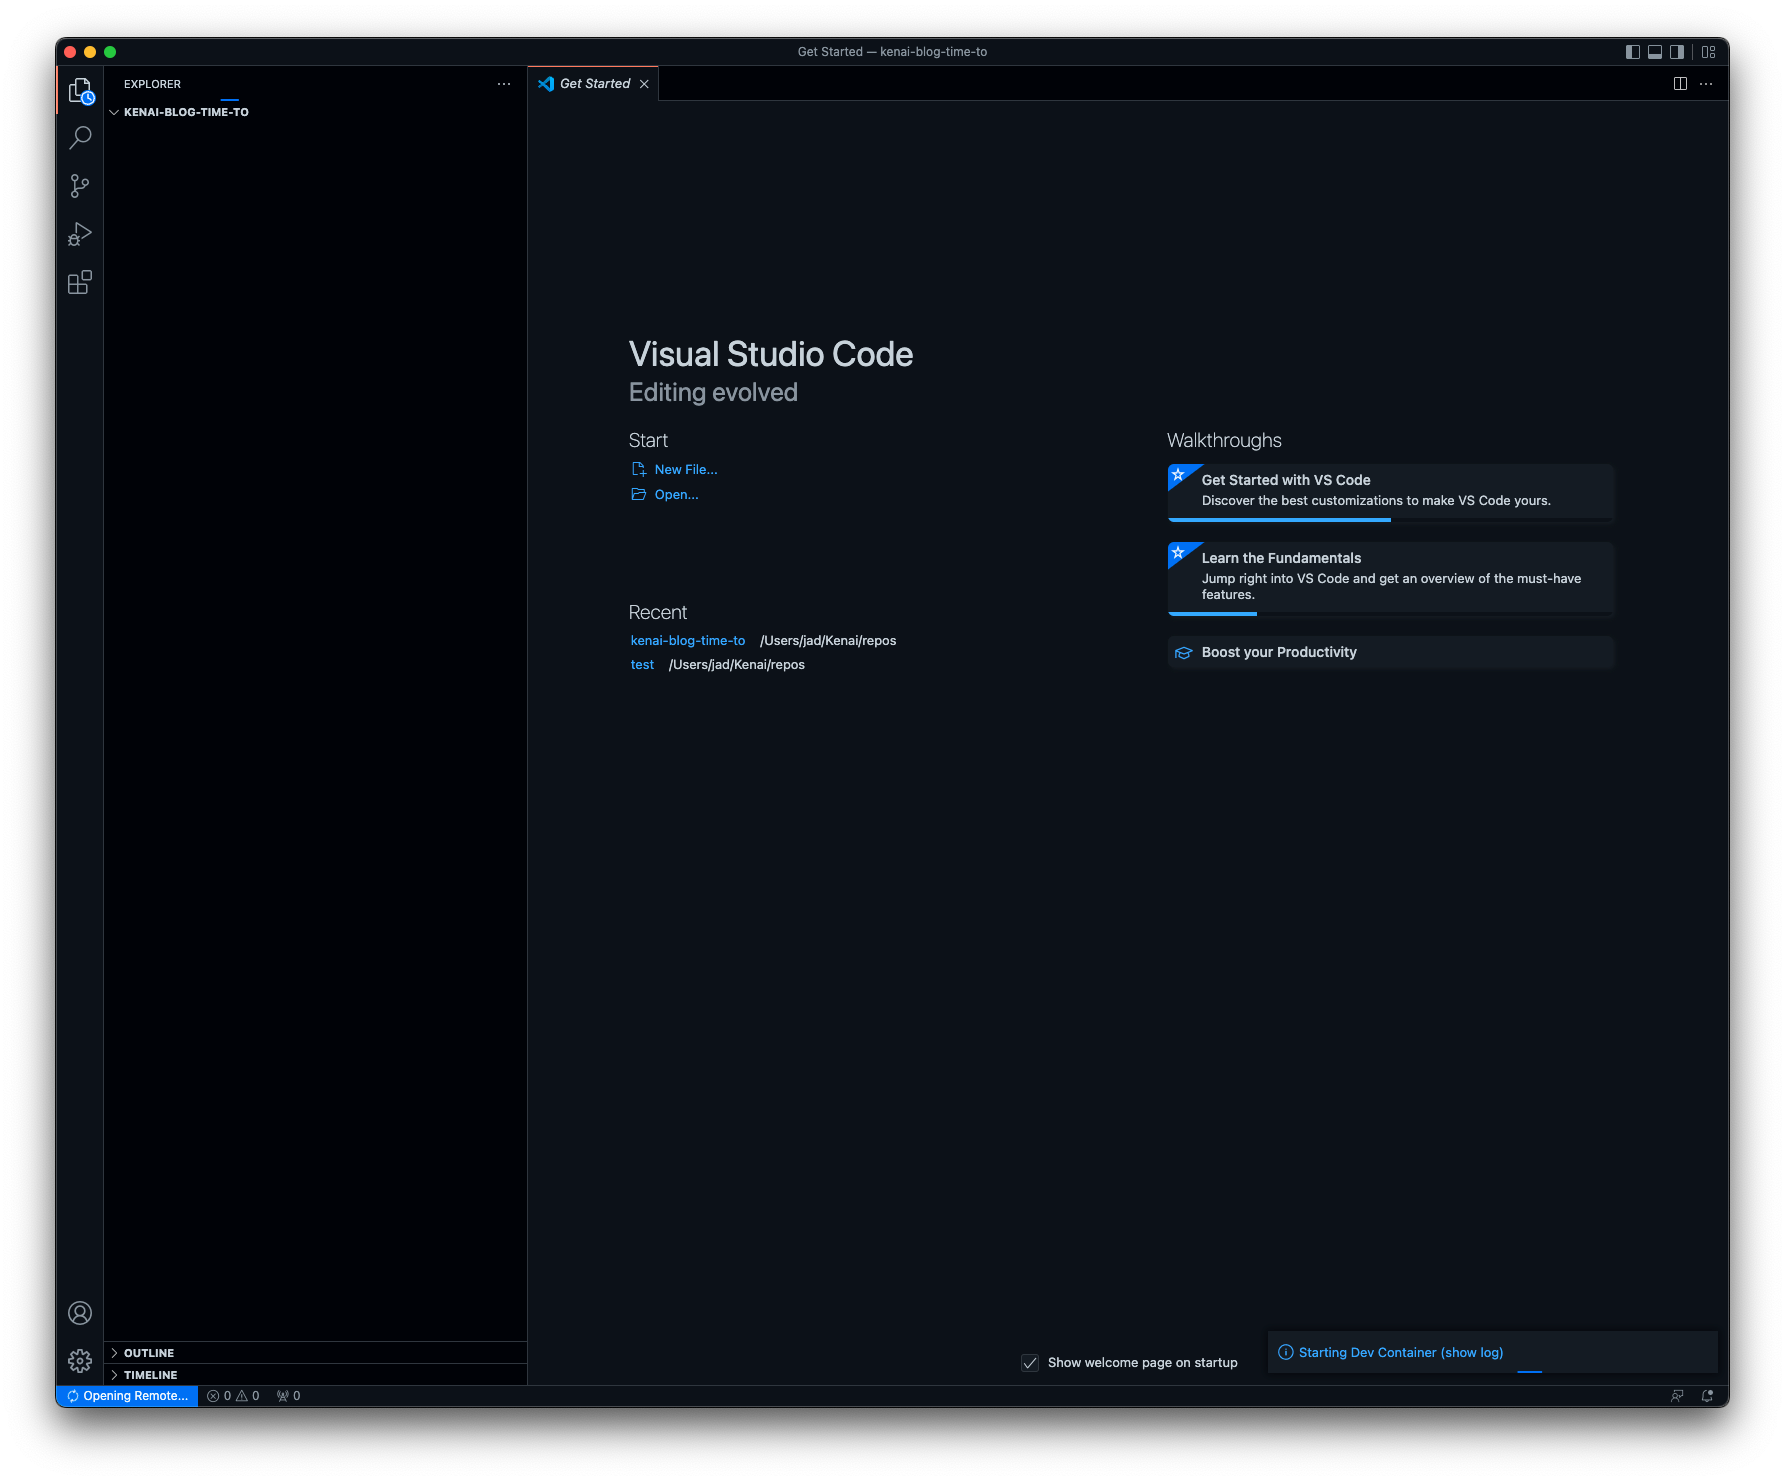
Once docker is installed and running, when executing the “Reopen in Container” command, the VS Code instance will indicate that it is “Opening Remote” in the bottom left. This can take some time if it is the first time you are building the container. So feel free to go grab a drink of your choice at this point ☕️.
Once completed, since we have specified post create commands, a terminal will pop up and execute the commands. As shown in the image below, a yarn install has been run and we have updated the npm version to that which we specified in our .devcontainer.json file.
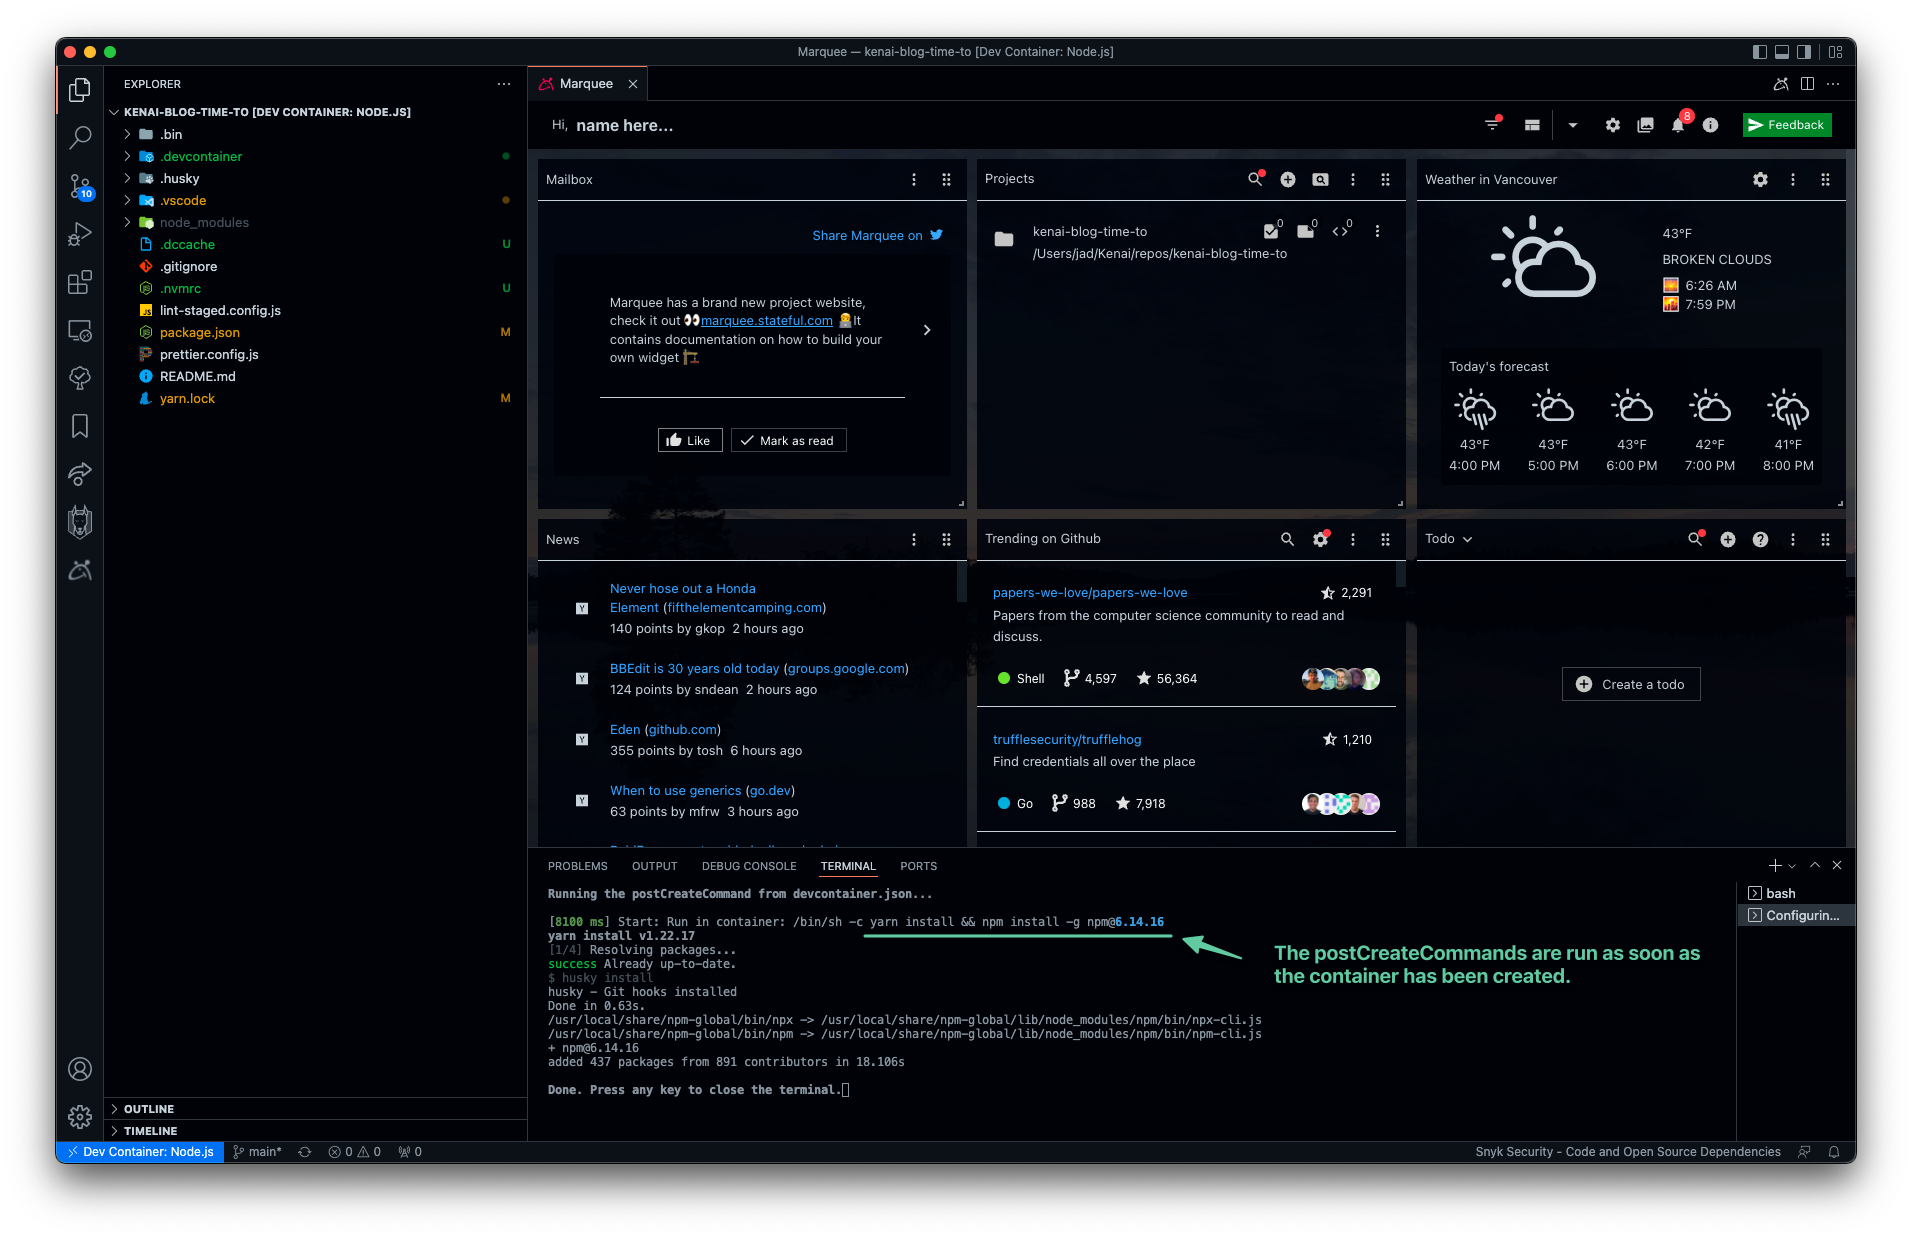
Closing this terminal, and opening a new one at the project root, we will see that nvm has worked its magic. It has detected the correct Node.js version from the .nvmrc file, installed it since it was not available in the container, and has set the terminal to use this specified version.
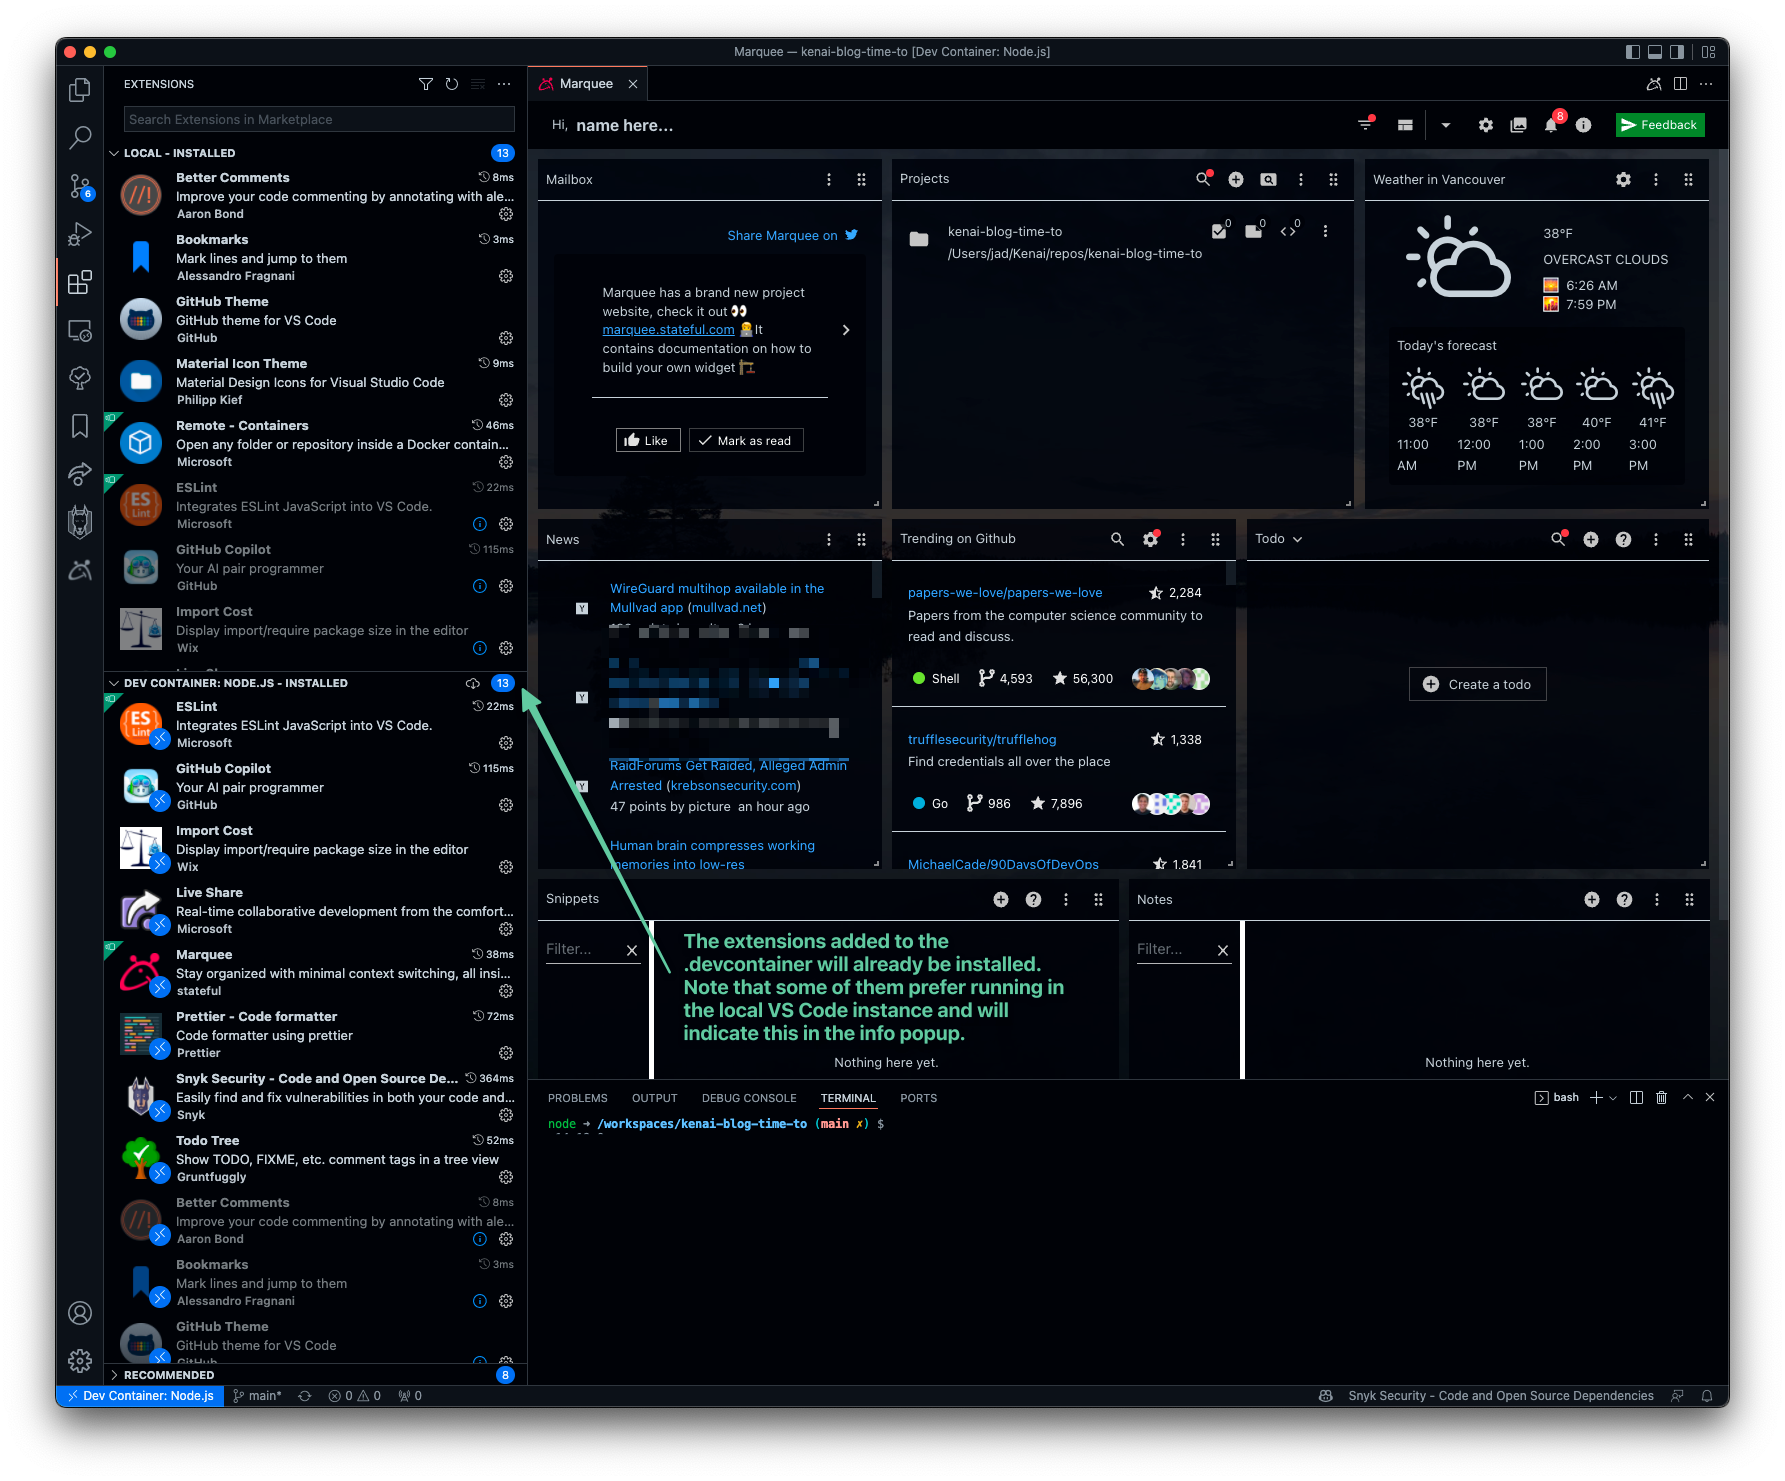
We can check the extensions and see that those that were specified in the .devcontainer configuration have been installed. Note in the image below that some of these extensions are grayed out either in the LOCAL - INSTALLED section, or the DEV CONTAINER: NODE.JS - INSTALLED section.
This is because certain extensions prefer to run in the local VS Code instance, while others perform better or only if installed within the dev container. We can use this feedback to optimize the extensions we include in our .devcontainer.json by removing those that prefer to run in the local VS Code installation.
Close-out
This has been a rather vanilla setup of the dev container and has barely touched the surface of what is possible with this toolset. There are many ways to customize and optimize this setup for your needs. We hope this post has whetted your appetite to go ahead, experiment with your setups, and leverage the tools to reduce the time to get devs started on your codebase.